An Ode to Traceability and Calibration Interval
Guest author Art Springsteen discusses standards for reflection measurements and the issues surrounding this topic.

At the recent (August is recent, isn't it?) International Diffuse Reflectance Conference in Chambersburg, Pennsylvania, I was chatting with Art Springsteen about standards for reflection measurements. (Where would be a better place?) Because he is an expert and a sucker for flattery, he agreed to write a column about some of the topics we covered.
As a major supplier of artifact standards of transmittance and reflectance to the pharmaceutical, agricultural, and remote sensing communities, we are asked two questions with disturbing regularity: One, "Are your standards traceable?" and two, "At what interval should the standards be recalibrated?" The answers to these two questions are, alas, not as simple as one might think, which leads to the gist of this article. We'll handle traceability first.

Art Springsteen is Chief Technical Officer for Avian Technologies LLC, Wilmington, Ohio. He can be reached at info@aviantechnologies.com.
A calibrated artifact (that is, a standard for reflection, transmission, or wavelength accuracy) is traceable when a direct line can be drawn to a calibrated artifact or procedure from a national metrological laboratory (NML) such as the National Institute of Standards and Technology (NIST, Gaithersburg, Maryland), the National Research Council Canada, or the Center for Metrology of Mexico in North America, or the National Physical Laboratory (UK) or Physikalisch Technische Bundesanstalt (PTB, Germany). But that's only part of the story. To really claim traceability, the artifact standard must be measured at the same geometrical (or reciprocal) as the NML-supplied standard and under similar (if not identical) conditions of bandpass and other instrumental parameters. The closer you get to these conditions, the better the claim of traceability. But the onus on traceability of a measurement rests not only with the seller of the artifact standard, but also the end user.

Emil W. Ciurczak
For example, almost all reflectance standards are provided with measurements made at 8°/hemispherical geometry. That is, the sample is illuminated at 8° from the normal and the reflected radiation is collected in an integrating sphere, usually a fairly large one to provide good integration. Avian Technologies (Wilmington, Ohio) provides this geometry of measurement, as do most of the major NMLs. It's the "typical" geometry used for reflectance for the UV–Vis–NIR. The problem is that there are very few, if any, commercial instruments for measuring NIR reflectance that are configured in this geometry. Almost all are set up using directional–directional geometry, typically 0:45 or 45:0 (first number is incident beam, second number is collection angle) or near-normal/near-normal, if a fiber-optic probe is used in the measurement. So, are measurements that are made with standards calibrated at one geometry, while the instrument on which these standards are used employs a significantly different geometry, "traceable"? Technically, they are not, and therein lies the problem.
NMLs typically measure artifacts at one or two optical geometries and over a modest range of wavelengths. And it is often not the range over which the end users want their instruments to be traceable. A prime example is 0:45 (or 45:0) radiance factor. A number of NMLs perform these measurements — good news! Unfortunately, if you happen to be using an instrument for NIR analysis, the standards you can get are calibrated only in the 360–830 nm range. That's not much comfort if you're trying to calibrate an NIR analyzer with an InGaAs array that runs from 1100 nm to 2200 nm.
So, what is a spectroscopist to do? Actually, the best one can hope for is to use standards calibrated at one geometry as transfer standards to another geometry. It's not a perfect solution — there can be differences in the slopes of the curves or other little instrumental artifacts — but at the moment, it is the best solution available.
The example I've given is for standards of diffuse reflection. Traceability for transmission standards isn't as big a problem (one has to worry about bandpass, data interval, and physical parameters such as measurement temperature), nor are wavelength standards (where matching of the instrument bandpass is the significant factor) or specular reflectance standards (geometry again).
So, what makes a commercial provider of artifact standards traceable?
- The measurement laboratory follows NML procedures
- The measurement laboratory has applicable artifact standards that are measured at the correct geometry and conditions
- The artifact standards are up to date and the calibration instrument is checked frequently against the artifact standards.
One final note: it matters not if the procedure you follow produces more precise (or even more accurate, as in the case of Fourier transform-infrared [FT-IR] measurement of wavelength calibration standards) results than that used in producing the traceable artifact standard. If any of the procedures mentioned previously are not followed, the traceability becomes highly questionable! And that's not a trivial matter. It requires a commitment on the part of the standardizing laboratory in both dollars and effort to maintain traceability.

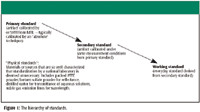
Figure 1
The other question that is asked frequently, particularly by customers in the pharmaceutical industry, is at what point a standard (or standards) should be recalibrated. To paraphrase ISO 17025, it is not the position of the artifact standard provider to designate a recalibration interval. Rather, it should be part of the quality system of the end user. To an extent, USP <1119> does address this matter but only for certain types of standards.
As a standards provider, we can't tell you when to have your standards recalibrated, but we urge common sense and also offer these guidelines. For standards that see frequent use and where the optical surface physically touches a probe or port on an integrating sphere, a frequent recalibration interval should be specified — typically a year or less. Whenever the surface of the standard becomes marred or scratched, it's probably time to have it recalibrated. On materials such as filters, especially those in cuvette-style holders, a two-year period is probably suitable, although on nonmounted filters, a frequent check for fingerprints is a wise idea! Standards in which the measured value is determined by electronic transitions of a molecule (such as wavelength standards like holmium oxide glass, powdered rare earth oxide mixtures, and the like), a five-year period is sufficient. (In reality, once a millennium should be fine!) But it's your quality system that determines these intervals. We can only suggest.
I hope this explanation has shed a little light into the often misunderstood realm of traceability and recalibration.
Emil W. Ciurczak is chief technical officer at Cadrai Technology Group (Bel Air, MD). He can be reached via e-mail at: emil@ciurczak.com

A Proposal for the Origin of the Near-Ubiquitous Fluorescence in Raman Spectra
February 14th 2025In this column, I describe what I believe may be the origin of this fluorescence emission and support my conjecture with some measurements of polycyclic aromatic hydrocarbons (PAHs). Understanding the origin of these interfering backgrounds may enable you to design experiments with less interference, avoid the laser illuminations that make things worse, or both.
Raman Microscopy for Characterizing Defects in SiC
January 2nd 2025Because there is a different Raman signature for each of the polymorphs as well as the contaminants, Raman microscopy is an ideal tool for analyzing the structure of these materials as well as identifying possible contaminants that would also interfere with performance.