Using an Innovative Mass Spectrometer and Non-Matrix–Matched Reference Materials to Quantify Composition of Metal Disks and Powders
This work demonstrates a new analytical technique and its quantification capabilities on a set of disparate metal samples. The laser ablation laser ionization time-of-flight mass spectrometer (LALI-TOF-MS) combines a dual-laser ionization system with a TOF mass analyzer for rapid, high-sensitivity elemental characterization of any solid material. To demonstrate the instrument’s quantification capabilities, nine different reference materials were analyzed. One solid and one powder reference material were then treated as “unknowns,” and quantified using calibration curves generated from the remaining reference materials. Despite being generated from reference materials of various matrices, elemental calibration curves are linear with an average R2 value of 0.96, even for elements that span several orders of magnitude in concentration range. For all elements quantified, results match the certified values of the “unknown” within the margins of error.
For most techniques for solid sample analysis, matrix-matched reference materials are a requirement for reliable quantification. Widely known and accepted among the analytical community, this limitation means metal-testing laboratories need to have a large inventory of solid reference materials. If solid reference materials are not available, quantification requires more complicated dissolution (digestion) sample preparation procedures. For developers of new metal alloys, such as those in the additive manufacturing industry, this dependence on matrix-matched reference materials presents a significant challenge. Additive manufacturing, specifically three-dimensional (3D) metal printing, typically involves transforming feedstock metal powders into finished parts. Compared to traditional manufacturing, this process has some significant advantages, and it is being widely adopted across a variety of industries. As a result, new materials are being developed to ensure desirable material properties throughout the printing process. It may prove difficult for traditional techniques to precisely quantify such novel, complex alloy mixtures with elemental compositions differing from those of established reference materials. Additionally, testing elemental constituents before and after the build requires consistent measurements across both a powder and solid matrix.
Traditional techniques, such as inductively coupled plasma–optical emission spectroscopy (ICP-OES) or ICP–mass spectrometry (ICP-MS), typically require acid digestion for the most accurate elemental analyses, which require chemistry expertise to properly execute, correct for signal interferences, and perform calibrations. Because these plasma-ionizing techniques can create high degrees of elemental suppression, spectral interferences, and matrix effects, accurate quantification depends on matrix-matched reference materials. Additionally, ICP-OES and ICP-MS are not easily capable of measuring carbon or nitrogen, especially when acid digestion is performed. To access high performance with less complicated sample preparation techniques, some users combine ICP-MS with laser ablation (LA) to form the LA-ICP-MS technique. Because of the complexity of each part in the combined LA-ICP-MS system and the lack of continuity between different configurations and vendor combinations, there are still numerous challenges in standardization, automation, and data collection and processing. Currently, LA-based techniques require complex and offline data processing because the LA and the ICP-MS systems are not well integrated, and the data are not easily handled in conventional ICP-MS software. Furthermore, LA-ICP-MS as a technique experiences both transport elemental fractionation and elemental suppression from space-charge effects in ion sampling (1).
Other well-known techniques for analyzing solid materials, such as X-ray fluorescence (XRF), also do not excel at light element determinations, particularly for carbon, nitrogen, and oxygen. These important light elements play a critical role in the manufacture of steel materials because their concentrations affect various physical properties, including brittleness, hardness, ductility, and the melting point (2). Therefore, a technique capable of quantifying the metallic, trace, and low-mass constituents in the same analytical session has the potential to accelerate the quality control (QC) process for additive manufacturing powders.
Providing versatility, high-throughput, excellent elemental coverage, and low detection limits, laser ablation laser ionization time-of-flight MS (LALI-TOF-MS) has the capacity to meet the growing analytical needs of the additive manufacturing industry, as well as the needs of traditional materials analyses. For both solids and powders, the innovative LALI method reduces matrix effects and enables quantification even in the absence of matrix-matched reference materials that are exact. Although LALI was discussed in peer-reviewed literature decades ago (3), technological limitations prevented its commercial development. Capitalizing on modern advances in solid-state lasers and computing, a new LALI-TOF-MS instrument was developed. For any solid material, this innovation provides high-throughput, high-sensitivity quantification of nearly the entire periodic table (1).
As shown in Figure 1, the LALI system uses two lasers. The first laser ablates, or releases, material from the surface of the solid sample and the second laser ionizes that ablated material in a discrete step. Directly analyzing solid materials minimizes the sample preparation procedures required by other high-sensitivity techniques. The ablation process creates both a temporal plasma and a neutral particle cloud. Targeting the neutral particles, the second laser fires after a short delay to allow the primary ions from the initial plasma to disperse. Compared to the primary ablation ions, which experience a high degree of matrix-dependent elemental fractionation, the neutral particles are more representative of the constituents of the sample. Creating ions from these particles results in greater stoichiometric accuracy and reduces matrix effects.
FIGURE 1: Illustration of the laser ablation (LA), laser ionization (LI), and time-of-flight (TOF) mass analysis processes.
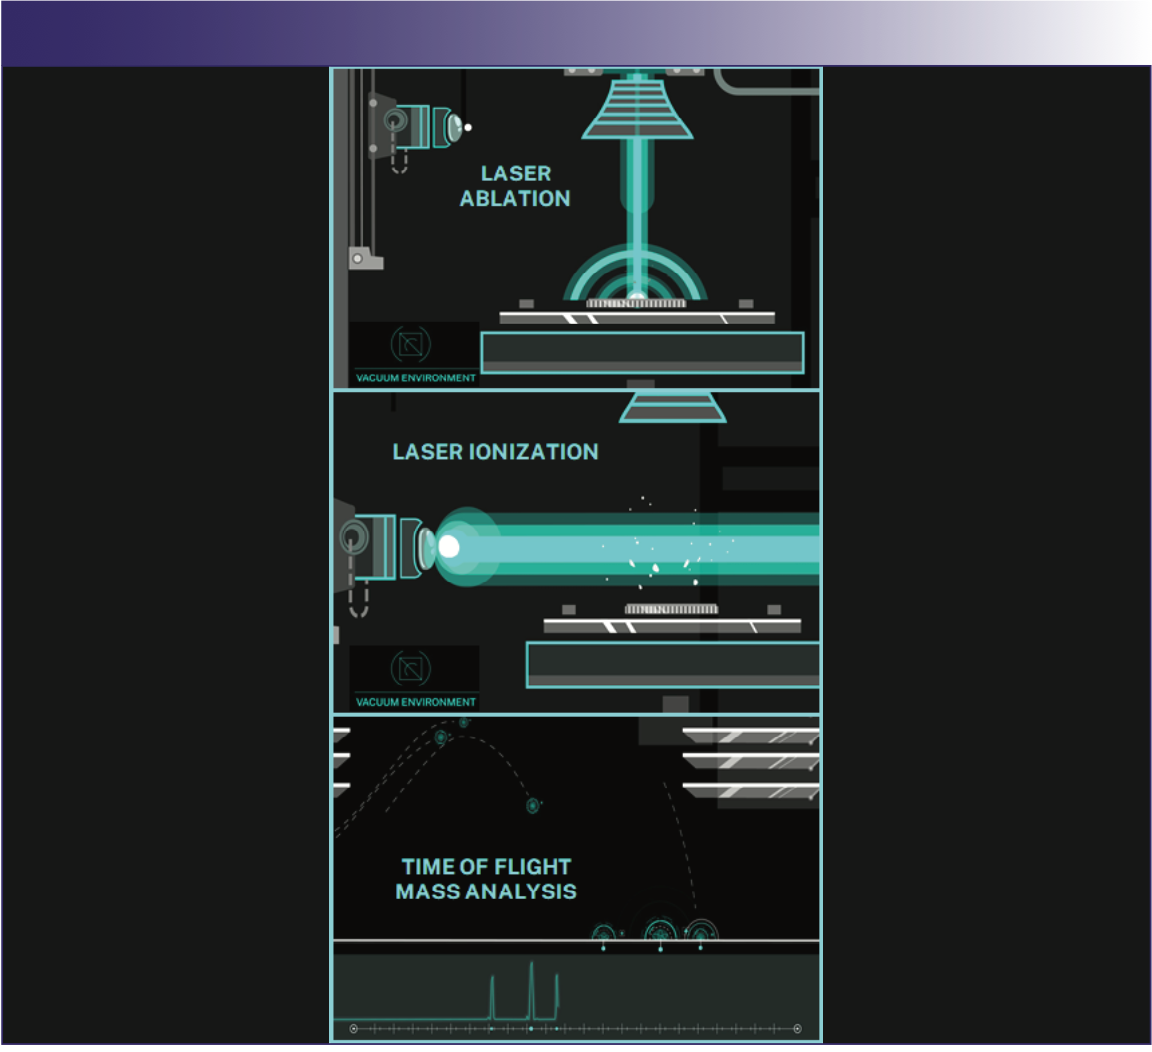
After ionization, the ions move through a series of ion optics to the TOF mass analyzer, which measures the difference in time required for ions of different masses to impact a detector. As shown in Figure 2, this results in a full mass spectrum. This entire process is performed under vacuum, greatly improving ion transmission efficiency compared to LA-ICP-MS, which involves an atmospheric-to-vacuum transition. In addition, this system does not require an inert gas, which facilitates the analysis of a wide range of elements without the need to account for interference from the gas composition (the argon gas used with ICP).
FIGURE 2: Mass spectrum from stainless-steel reference material, IARM Fe316L-18, analyzed by LALI-TOF-MS. The zoomed inset for m/z 10–16 highlights the trace low-mass elements boron, carbon, nitrogen, and oxygen. Text insert boxes in the figure compare measured and theoretical (known) isotope ratios for boron.
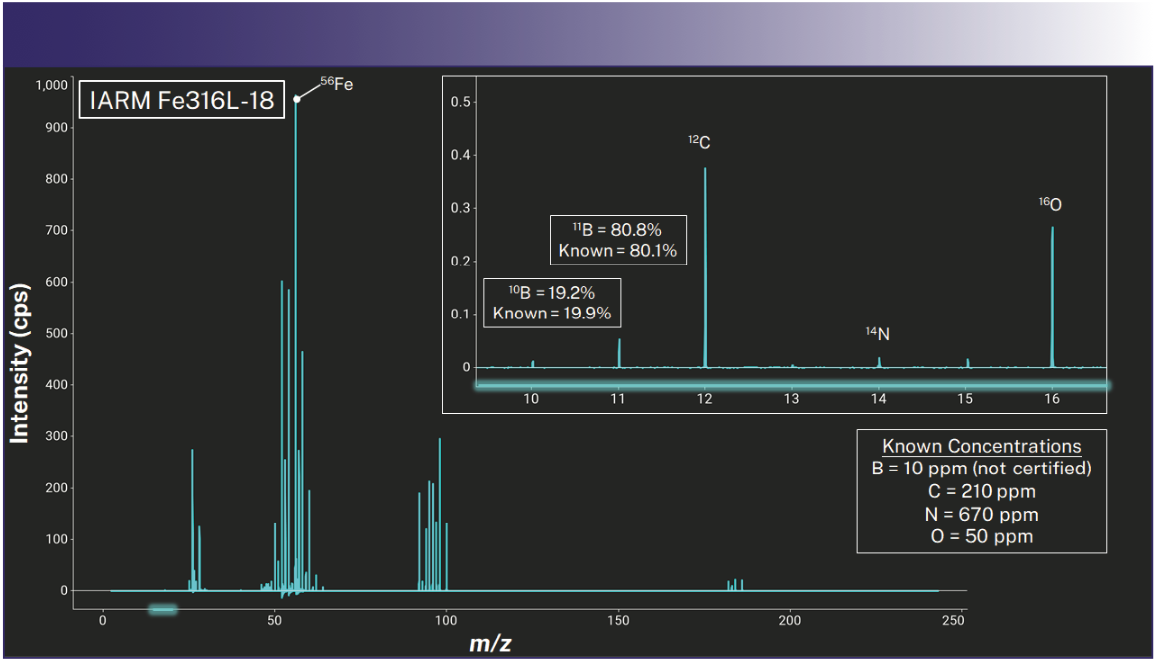
Figure 2 shows an example mass spectrum from analyzing a stainless-steel reference material, IARM Fe316L-18. The zoomed inset for the mass range m/z between 10–16 highlights the trace low-mass elements that are difficult for many techniques to quantify, which are boron, carbon, nitrogen, and oxygen. Note the abundance of these isotopes are three to four orders of magnitude smaller than that of the matrix isotope, 56Fe. For boron, with two naturally occurring isotopes, the text boxes compare its theoretical (known) isotope ratios with those quantified from the peak areas of the mass spectrum. The experimentally derived isotope ratios are within 3% of the known values, demonstrating how LALI-TOF-MS results in mass spectra with isotopically correct peak intensities. Compared to other MS techniques, LALI-TOF-MS allows for more reliable (and automated) isotopic verification and quantification.
Testing Quantification Capabilities
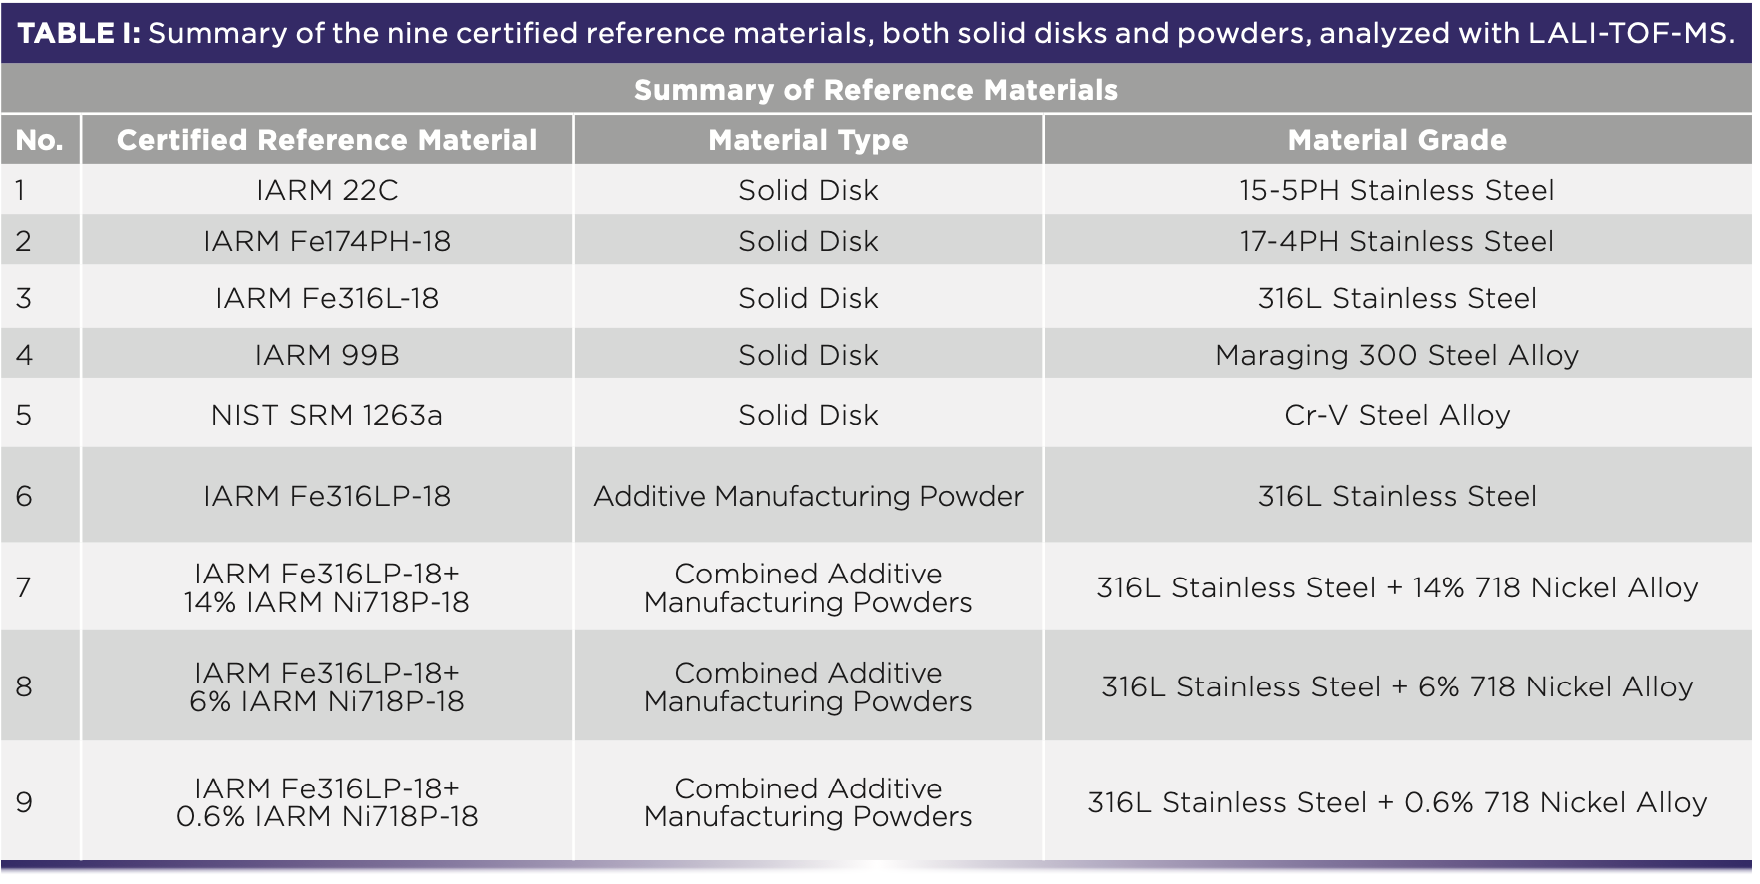
To test the quantification capabilities of the technique, nine certified reference materials (CRMs) were analyzed: three solid stainless-steel disks, two solid steel alloys, and four pellets pressed from additive manufacturing powders. Of the four powder CRMs, one pellet was pressed from pure stainless-steel powder (IARM Fe316LP-18) and three pellets were pressed from mixtures of the stainless-steel powder doped with various amounts of nickel alloy powder (IARM Ni718P-18), ranging from 0.6–14% by weight. Table I presents details of these reference materials.
LALI-TOF-MS directly analyzes CRMs 1–5 without any sample preparation. Preparing samples from CRMs 6–9 involves pressing the powders into 1.3-cm (0.5-in) solid pellets using a pellet die set and hydraulic press. Figures 3a–c demonstrate the pellet die set and simple sample preparation procedure. Once prepared, each sample is analyzed using three 0.2 mm2 areas, which are rastered twice. The first pass is to remove any surface contaminants, and the second pass is used for quantification.
FIGURE 3: (a) Pellet die set; (b) an analyst adding metal powder to the set; (c) final pelletized metal alloy powder; and (d) an example post-analysis sample. The three lines are the raster areas used for quantification.
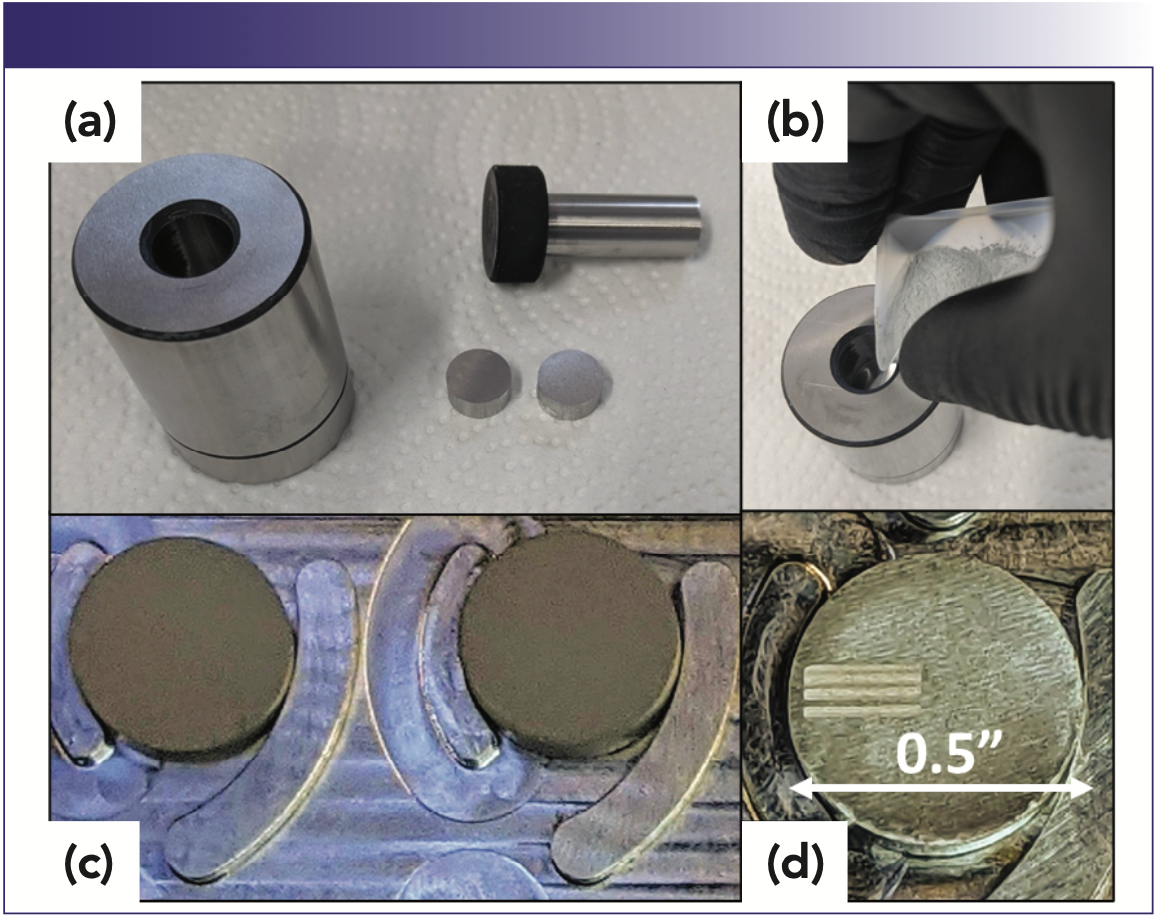
Figure 3d shows an example pellet sample after LALI-TOF-MS analysis. The three lines on the pellet’s surface demonstrate the raster areas of the quasi-nondestructive process. The sample tray of the instrument can accommodate nine 1.3-cm (0.5-in) samples. After loading the sample tray, the user can set up the instrument to analyze all nine samples within the same session. Once the instrument has brought the sample chamber to vacuum, typically achieved while the user is defining testing conditions, the analysis requires only 3 min per sample. Testing the quantification capabilities of the new technique involves treating one CRM as an “unknown” and quantifying its major and trace elemental constituents with the calibration curves made from the remaining CRMs. To assess quantification on both solid and powder materials, this work presents results from using both the solid and powder forms of IARM Fe316L-18 (CRM #3 and #6) as the unknowns.
Calibration and Quantification Process
As discussed, LALI-TOF-MS generates mass spectra for each laser shot, which are combined, averaged, and baseline subtracted. The instrument’s software can then detect each element by its naturally occurring isotopic pattern, as shown in Figure 2. For each isotopically verified element, the software integrates the mass spectra peak area and normalizes its intensity to that of a major matrix element, which is iron in this case. Plotting the normalized intensities and the known concentrations of the CRMs creates a calibration curve for each element. If an element’s calibration curve has a strong correlation coefficient and sufficient data points, it can be used to quantify an unknown sample’s concentration.
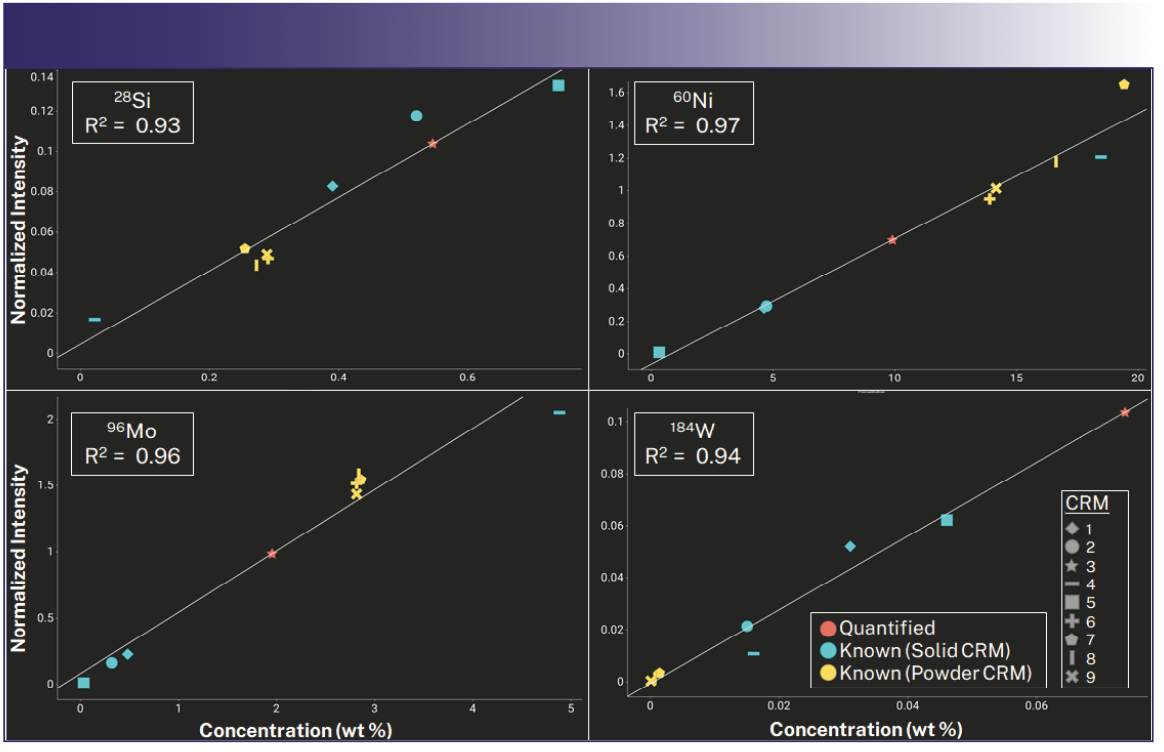
Figure 4 shows example calibration curves of four elements using the isotopes: 28Si, 60Ni, 96Mo, and 184W. For each graph, the y-axis is normalized intensity, and the x-axis is concentration (wt.%). Displayed in orange, the CRM treated as the “unknown” is quantified using the best-fit line through the known CRMs, each of which are indicated by distinct shapes (as listed in Table I). Despite using reference materials of different matrices, calibration curves are relatively linear, with an average R2 value of 0.96, even for elements that span several orders of magnitude in concentration range. For instance, the calibration curve of nickel includes concentrations ranging from 0.23% for CRM #5 to 19.4% for CRM #7 and has an R2 value of 0.97.
FIGURE 4: Calibration curves of four isotopes: 28Si, 60Ni, 96Mo, and 184W. Each graph plots normalized intensity vs. concentration (wt.%) and the known CRMs are fitted with a linear trendline. The “unknown” concentration is then quantified from the best-fit line.
The bar graphs in Figure 5 and Figure 6 compare quantified results to certified values for the 316L stainless-steel disk (CRM #3) and the 316L stainless-steel powder (CRM #6), respectively. Using the solid disk as an “unknown,” it was quantified with calibration curves generated from all remaining CRMs. Alternatively, the powder was quantified from calibration curves created from the doped powder mixtures (CRMs #7–9) only. In each graph, certified values are gray and those quantified by LALI-TOF-MS are blue. Concentrations of major elements are presented in weight percent (wt.%) and those of trace elements are in parts-per-million (ppm). On the known values, the error bars indicate the certified uncertainties. Uncertainties for the quantified values are calculated to a 95% confidence interval using least squares linear regression of the calibration curves’ points and those unknown (all measured in triplicate). Note these expanded uncertainty values include a combination of sampling, measurement, and calibration uncertainty.
FIGURE 5: Results from treating CRM #3 as “unknown” and quantifying its constituents from calibration curves generated by the remaining CRMs. Major element concentrations are represented in wt.% and those of trace elements are in ppm. For each element, the certified value is gray, and the quantified value is blue. Error bars represent the certified values for uncertainties. For the quantified values, uncertainty is calculated using a least squares linear regression of the calibration curves’ points and unknowns.
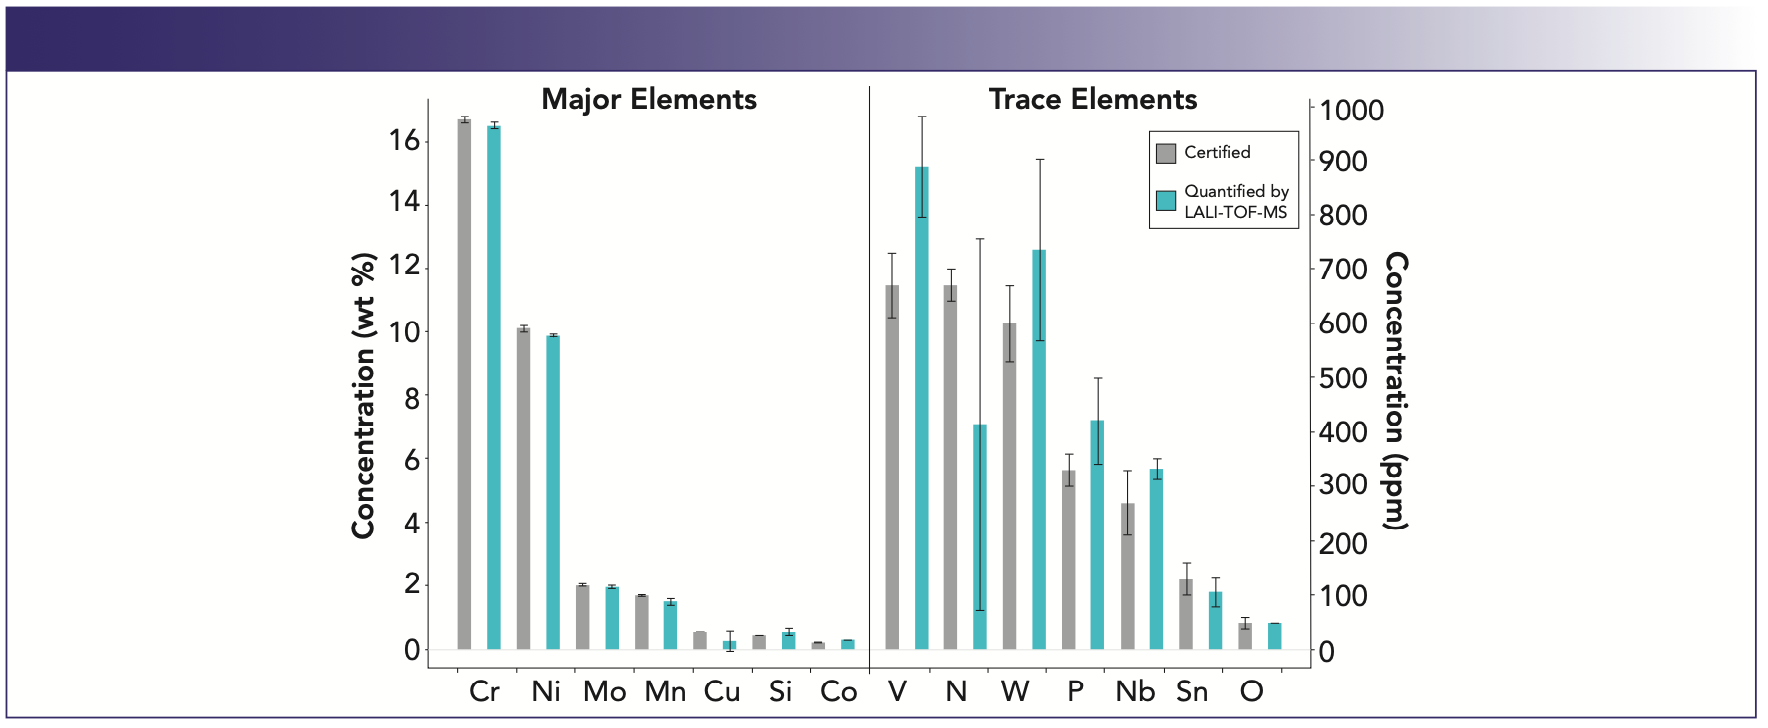
FIGURE 6: Results from treating CRM #6 as “unknown” and quantifying its constituents from calibration curves generated by the other powder CRMs (#7–9). Major element concentrations are represented in wt.% and those of trace elements are in ppm. For each element, the certified value is gray, and the quantified value is blue. Error bars represent the certified values for uncertainties. For the quantified values, uncertainty is calculated using a least squares linear regression of the calibration curves’ points and unknowns.
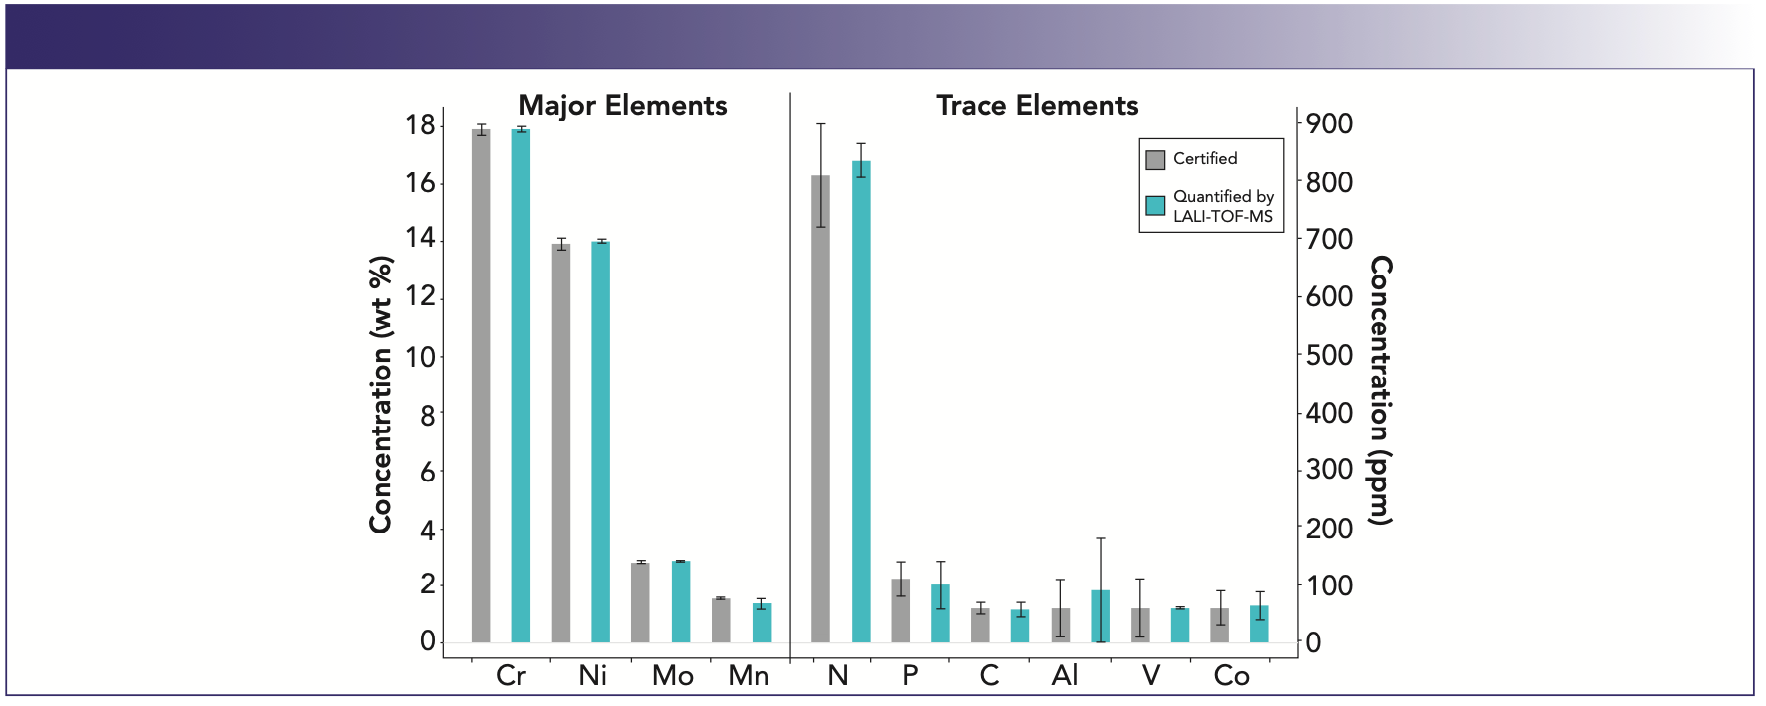
The average uncertainty and the average deviation from the known results are slightly larger for the solid disk analysis than the pressed powder, which is expected because the solid disk was quantified using all of the calibration points, while the powder was quantified by standard addition, which resulted in more linear calibration curves that span a narrower concentration range. Nevertheless, both techniques were successful, and results from both “unknowns” match the certified values within the certificate margins of error.
Discussion
Results demonstrate the quantitative capabilities of LALI-TOF-MS for both solid metal and powder elemental characterization. Both the 316L stainless-steel solid disk and the stainless-steel powder reference materials’ elemental constituents were quantified within the certified values’ margins of error. For quantified elements, the average internal precision for the solid disk is 0.5% and 1.1% for the powder. For the solid reference material, quantified results’ accuracy for major elements are 4% on average, and all major elements are within 10% of the certified values. The 316L stainless-steel powder’s results for major elements also have an average accuracy of 4%, and all major elements quantified in the powder are within 13% of certified values.
For many major elements, ASTM specifications for stainless steels include an acceptable concentration range of ±0.5 to ±2.0 wt.%, depending on the element (4). With LALI-TOF-MS, all major elements were quantified within 0.02–0.21 wt.% of certified values, and uncertainties calculated with a 95% confidence interval were all less than ±0.18 wt.%. The precision and accuracy of these results indicate that LALI-TOF-MS exceeds the precision and accuracy required to meet the needs of the additive manufacturing industry. Typical powder material data sheets specify only an upper limit for trace elements’ concentrations like carbon and nitrogen (4), which LALI-TOF-MS also verified.
In addition to bulk characterization, LALI-TOF-MS can be used for elemental mapping of powder or solid materials. Each map displays the spatial distribution of any element of interest at the resolution of the spot size of the ablation laser. Depending on the application, the user may adjust the laser spot size between 1–200 μm. For additive manufacturing, this capability can identify chemical heterogeneity in the powders or printed parts. Beyond additive manufacturing applications, elemental mapping can also be impactful in failure analysis or diagnosing corrosion.
Conclusion
This work validates LALI-TOF-MS as a promising new and alternative technique for quantifying elemental constituents of metal disks and powders. For all major and trace elements, quantified results match those of certified results within margins of error. Using a disparate set of metal reference materials to generate linear calibration curves demonstrates LALI-TOF-MS does not require exact matrix-matching of reference materials with samples. LALI-TOF-MS is an attractive solution for metals testing, specifically additive manufacturing. Because it can quantify low-mass elements, trace elements, and metallic constituents in the same analytical session, it can directly analyze solid materials and pelletized powders without complicated sample preparation procedures, and it does not depend on matrix-matched reference materials for reliable quantification, which can support new material development. LALI-TOF-MS offers an answer to the analytical needs for new materials being rapidly developed. This exciting, new technique provides a simple, compact, and cost-effective alternative to traditional analytical methods for these types of metallic matrices and a wide range of other solid samples.
Acknowledgments
This work was performed under the following financial assistance award 70NANB21H066 from US Department of Commerce, National Institute of Standards and Technology.
References
(1) J.T. Williams and J.C. Putman, Spectroscopy 35(5), 9–16 (2020).
(2) Powder Metallurgy: Elemental Analysis of Metal Powders and Metal Parts Produced by Additive Manufacturing - Knowledge Base - Applications, https://www.eltra.com/applications-elemental-analysis/knowledge-base/powder-metallurgy-elemental-analysis-of-metal-powders-and-metal-parts/ (accessed Jan 31, 2022).
(3) G.R. Kinsel and D.H. Russell, J. Am. Soc. Mass Spectrom. 6(8), 619–626 (1995). https://doi.org/10.1016/1044-0305(95)00262-C.
(4) EOS StainlessSteel 316L Material Data Sheet, https://www. eos.info/03_system-related-assets/material-related-contents/ metal-materials-and-examples/metal-material-datasheet/ stainlesssteel/material_data-sheet_eos_stainlesssteel_316l_ en_web.pdf (accessed Jan 31, 2022).
ABOUT THE COLUMN EDITOR
Robert Thomas, the editor of the “Atomic Perspectives” column, is the principal of Scientific Solutions, a consulting company that serves the educational and writing needs of the trace element analysis user community. Rob has worked in the field of atomic spectroscopy and mass spectrometry for more than 45 years, including 24 years for a manufacturer of atomic spectroscopic instrumentation. He has authored more than 100 scientific publications, including a 15-part tutorial series, “A Beginners Guide to ICP-MS.” In addition, he has authored five textbooks on the fundamentals and applications of ICP-MS. His most recent book, Measuring Heavy Metal Contaminants in Cannabis and Hemp, was published in September 2020. Rob has an advanced degree in analytical chemistry from the University of Wales, UK, and is a Fellow of the Royal Society of Chemistry (FRSC) and a Chartered Chemist (CChem). Direct correspondence to: SpectroscopyEdit@mmhgroup.com●

ABOUT THE CO-AUTHORS
Ellen Williams is the VP of Business Development and applies “technical storytelling” experience to Exum’s sales, marketing, and grant writing. From an international service company to startup technology companies, her background includes over a decade of technical and project management roles in the energy industry.

Peyton Willis is a Laboratory Chemist at Exum and is responsible for sample preparation, data collection, and data processing. Before joining Exum, she graduated with a BS in Chemistry from the Colorado School of Mines. Here, she worked on research in lanthanides, specifically in lanthanide separation and kinetics.

Alan Koenig is currently the Analytical Laboratory Manager for Metallurgical Services at Newmont. He is a self-described instrument nerd and has worked extensively with solid sampling techniques, such as LA-ICP-MS and LIBS. He spent over 15 years running the LA-ICP-MS Facility at the US Geological Survey and has worked in the instrumentation industry for two decades.

Jonathan C. Putman, PhD, is the Director of Applications at Exum and builds meaningful relationships with customers and providing solutions tailored to meet their applications needs. Jon has nearly a decade of analytical chemistry experience at the National High Magnetic Field Laboratory at Florida State University. ●


LIBS Illuminates the Hidden Health Risks of Indoor Welding and Soldering
April 23rd 2025A new dual-spectroscopy approach reveals real-time pollution threats in indoor workspaces. Chinese researchers have pioneered the use of laser-induced breakdown spectroscopy (LIBS) and aerosol mass spectrometry to uncover and monitor harmful heavy metal and dust emissions from soldering and welding in real-time. These complementary tools offer a fast, accurate means to evaluate air quality threats in industrial and indoor environments—where people spend most of their time.