Calibration Transfer, Part VI: The Mathematics of Photometric Standards Used for Spectroscopy
How do current commercial instruments vary with respect to photometric accuracy and precision over time? What are potential solutions to this challenge?

Photometric accuracy and precision, as reproducibility and repeatability, respectively, are essential for building consistent large databases over time for use in qualitative searches or quantitative multivariate analysis. If the spectrophotometer in use is inconsistent in terms of linearity and photometric accuracy, the analytical precision and accuracy will be jeopardized over time. Photometric accuracy and linearity drift over time within a single instrument or between instruments and create errors and variation in the accuracy of measurements using databases collected with different photometric registrations. How do current commercial instruments vary with respect to photometric accuracy and precision over time? What are potential solutions to this challenge?
Photometric precision and accuracy, when measured with a certain protocol, are termed photometric repeatability and reproducibility. The photometric stability within a single instrument and between multiple instruments over time is important for seamless transfer of multivariate calibrations, and for the unbiased application of qualitative search libraries. In a previous installment (1), we discussed the importance of the stability in the wavelength axis of spectrophotometers and compared several leading instruments for differences. Data integrity depends on the accuracy and precision of the X (wavelength) and Y (photometric) axes. There are multiple factors affecting the photometric stability of spectrophotometers: the alignment and mechanical tolerances of optical elements; detector noise characteristics and amplitude; detector linearity; detector electronics, including gain and offset settings; signal amplifier noise; and sample presentation repeatability and reproducibility (2,3).
Accurate and precise photometric axis alignment is a complex issue for commercial instrument manufacturers and design engineers. As always, the quality of manufacturing, design tolerances, quality of components, and maintenance of stringent system calibration protocols are required for photometric stability. As is the theme of this series of columns, the appropriate use of primary and secondary reference standards and materials is also essential to superior metrical performance using spectroscopy.
Different Approaches to Alignment of the Photometric Axis
Approaches to aligning the photometric accuracy of any spectrophotometer may involve measuring a standard reference sample and correcting the instrument photometric values to those values obtained by measuring the same sample on a highly accurate and traceable spectrophotometer. This is basically a sound approach, but a number of questions arise: How often should the recalibration be performed? How much difference between measured and reference standard values is acceptable before one recalibrates the photometric axis? What values are to be used for the photometric reference standard? Who is to decide what the correct reference (measurand) values should be? Are the values measured from a master instrument to be used? Should the values measured from a typical production instrument be more appropriate to align all instruments such that production instruments are alike? This would be a viable strategy if all instruments were alike for all time. However, since this is not so, one must look to calibrate to a permanent set of references, such as pure atomic materials, metals, pure molecules, optical materials, or emission sources. If one uses these materials with known photometric values and spectral shapes, then instruments can always be corrected to a known reference standard, and this will always be true even in the future. For this physical reference approach, there is only dependency on natural laws and physics, not unstable materials and instrumentation.
The master instrument concept was acceptable for its time (4–6), but metrical requirements are best served by first principles calibration. The measurands (or actual nominal values) for calibrating photometric scales would optimally be obtained using first principles whenever possible because this is a universal approach and is based on pure physical science and metrology, which by definition is fixed to a specific known uncertainty. The national laboratories around the globe use this approach as much as possible (7,8).
A protocol to correct photometric values measured using a spectrophotometer would ideally provide high precision with universal accuracy, so that expensive and time consuming databases created over time are aligned with any instrument technology, which could be carried reproducibly into the future. In addition, using a first principles approach allows one to standardize the data based on known photometric values at any time. First principles photometric calibration may be defined electronically and, thus, no physical instrument or object is required to transfer the technology required for photometric adjustments or calibration.
To create a first principles photometric calibration protocol one requires repeatable and well-characterized photometric material standards, with known stability, and with well-defined uncertainty. To have minimal effects for calibration transfer, absorbance, or photometric response, accuracy should have an absolute deviation of less than ± 0.02% T (or R) versus a National Institute of Standards and Technology (NIST) traceable (or calibrated) spectrophotometer measurement at 0.09% T (or R) (3.046 AU) to 0.10% T (or R) (3.000 AU) for specific reference standards at ~1333 nm (7500 cm-1) and ~2222 nm (4500 cm-1), respectively. Photometric accuracy must be ± 0.01% T (or R) (± 0.02 AU) in agreement with calibration (reference) instrument (absolute maximum deviation) across all wavelengths. Absorbance or response repeatability of ± <0.001 AU (1 sigma) would be optimal.
The NIST Uncertainty Number for SRMs
NIST uncertainty is a measure of uncertainty unlike the typical manufacturer report as either precision or accuracy. For example, NIST uncertainty has been calculated from equation 1 (9).

where A = twice the largest standard deviation of measurement of multiple wavelength photometric values (measurands) versus the spectrometer measured values over a period of one month (or other designated period of several weeks duration); B = twice the standard deviation of the uncertainty in the photometric data measurement method used (Note: the noise on any photometric measurement adds uncertainty to the absolute photometric values); and C is the maximum variation in the reference standard because of humidity, material instability, photometric bleaching, or temperature changes over a specified range and conditions. (Note: The number 2 [twice] is referred to as the k value, also known as the coverage factor, see reference 7). As mentioned in a past column, one may also obtain more detailed information on the history of the international metrical committees responsible for defining the technical details for uncertainty associated with measurement results; the reader is referred to appendices C and D in reference 7 for historical details.
Commercial Instrument Photometric Data
Measurement of Photometric Accuracy
As we demonstrated in a previous installment (1), a comparison of the leading near infrared (NIR) spectrophotometer performance characteristics is very revealing as to the state of the art for wavelength and photometric accuracy and precision in modern instrumentation. For this paper, an identical sample of Fluorilon R99 (Avian Technologies LLC) was measured across four different instrument models and manufacturers; the same sample in the same sample holder is used for all the measurements. The identical sample was measured on a double monochromator system carefully calibrated using NIST standard reference materials and other calibration protocols to obtain the reference (or measurand) values. The example in Figure 1 shows the results for Fluorilon R99, 99% reflectance standard. The dotted line spectrum indicates the reference instrument measurements. It is immediately obvious that only one manufacturer is carefully matching the instrument photometric values to the reference standard values. Even so, only one of the instruments match the standard with sufficient minimum accuracy. This indicates that data collected on any of the instrument models tested will result in significant photometric differences that must be compensated for if using databases collected across the various instrument models and manufacturers.
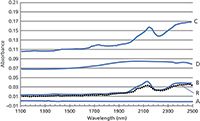
Figure 1: An identical Fluorilon R99 sample measured on four different (that is, A through D) commercial NIR spectrophotometers as compared to a reference (R) spectrometer measurement (dotted line).
The mean difference between the measured and measurand values for photometric "accuracy" is determined by equation 2.

Where Āi is the average measured reference material photometric value for the test instrument in absorbance units (AU) over the entire 1100–2500 nm wavelength range; and Āref is the average measured reference material photometric values for the calibrated reference instrument in absorbance units over the entire 1100–2500 nm wavelength range. The results are reported as: mean difference or "accuracy."
Table I demonstrates the average accuracy for each of the instrument models A through D over the wavelength range of 1100–2500 nm as compared to the reference calibrated spectrophotometer (PerkinElmer Lambda 9/19 UV-vis-NIR spectrophotometer). Note that instrument B is within our minimum specified goal of (±0.02 AU) across the spectral range. This speaks well of calibrating each instrument based on a known photometric standard.

Table I: Average photometric values for instrument models A through D as compared to a reference spectrophotometer across a range of 1100â2500 nm
Measurement of Photometric Precision
The mean root mean square (RMS) noise for each of the four instruments for the Fluorilon photometric standard is shown in Figures 2 and 3 and Tables II through IV.
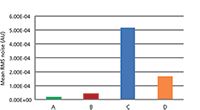
Figure 2: A bar graph showing the relative mean RMS noise (in absorbance units) for three replicate measurements of Fluorilon R99 for instruments A through D. Note that instruments A and B are dispersive instruments and C and D are Fourier transform (FT)-NIR instruments. The mean RMS value (as illustrated here) is computed as the square root of the average variance of the photometric values for the three replicate measurements at each wavelength (that is, 1100â2500 nm in this case).
The RMS noise is computed for each wavelength for the three replicate measurements of Fluorilon R99. The computation is completed using equation 3 as the standard deviation of the absorbance values at each wavelength for the sample set of three Fluorilon R99 spectra measured serially. In this equation, the mean spectrum photometric (absorbance) value is computed at each wavelength i as (Āi) and compared to the measured photometric values at each wavelength and for each of the replicates as (Aij). The photometric repeatability is then computed as equation 3:

where (si) is the standard deviation for the scan-to-scan photometric values (as RMS precision or repeatability) for the instrument under the specific measurement conditions, and where (Aij) are individual photometric values (as absorbance) at wavelength position for sample i and replicate or scan number j; (Āi) is the average photometric (or absorbance) value for the replicate scan set; and n is the number of replicate measurements (that is, three serial replicates of Fluorilon R99 in this case).
The mean spectrum photometric value at each wavelength position (Āi) is calculated as equation 4.

If we compute the repeatability or the standard deviation of error between the measured values and the reference (measurand) values within each single instrument based on Fluorilon R99, the following data are found for different wavelength regions as denoted in the table and figure legends (Figure 3 and Tables II through IV).
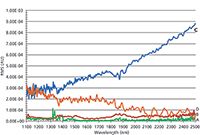
Figure 3: A plot of the RMS noise or standard deviation of the variation (or relative RMS noise in absorbance units) at each wavelength for three replicate measurements of Fluorilon R99. Instruments A through D are shown. A and B are dispersive instruments and C and D are FT-NIR instruments. Tables II through IV show the comparative pooled photometric precision (RMS noise) for different respective wavelength regions.
As compared to our desired specification of an absorbance or response repeatability of <0.001 AU (1 sigma) or 1E-03 AU we would have to rate the instruments for short term precision as very good to excellent. However, measuring these samples periodically over a one month period would better reveal stability of the spectrophotometer and the frequency required for adjustments or recalibration of the photometric axis.

Table II: RMS noise for Fluorilon R99 measured over 1500â2500 nm, three serial replicate scans
Estimating the Relative Uncertainty Across the Tested Commercial Instruments
Let's look at this as a pooled standard deviation of error for the reflectance photometric values at three measured wavelengths (that is, 1500, 1750, and 2450 nm) for all the A through D instruments. The measurements and associated statistical parameters are shown in Table V. Column one is the instrument models A through D; column two is the measurement wavelengths selected as a representative set (in nanometers); columns three through five represent the reflectance measurement at each wavelength of the reference Fluorilon R99 sample; column six is the precision of reflectance measurements at each wavelength and for each instrument, also the pooled precision is given for each set of instrument reflectance measurements. Column seven is the average reflectance values for each wavelength for each instrument. Column eight is the Fluorilon R99 reference (measurand) values for each measurement wavelength; and column nine is the reflectance photometric accuracy as the average measured values minus the reference (measurand) values at each measurement wavelength; this value is computed for each wavelength as in equation 1 by substituting the reflectance values rather than the absorbance values. The average accuracy is the average reflectance accuracy values for each instrument for all wavelengths measured (column 10 in Table V).
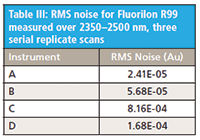
Table III: RMS noise for Fluorilon R99 measured over 2350â2500 nm, three serial replicate scans
The pooled accuracy for each instrument is determined using the standard deviation of error (Rsi) between the measured and measurand (reference) reflectance values for the Fluorilon R99. We may compute the pooled standard deviation of the combined reflectance values at each wavelength for each instrument for the measured (Rij) versus the measurand or reference (Rref) photometric values. Therefore, the pooled standard deviation of reflectance values for each instrument (Rsi) is calculated as equation 5.

The pooled standard deviation results from the measurement data in Table V are shown in Table VI.
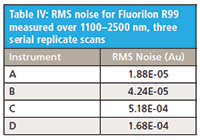
Table IV: RMS noise for Fluorilon R99 measured over 1100â2500 nm, three serial replicate scans
From Table VI it may be observed that instruments A and B are more repeatable (or precise) than C and D based on the test criteria. Note these values are all in reflectance units. So one may estimate the standard statistical confidence levels for a randomly selected commercial spectrometer, and express the confidence limits as follows:
- For a 68% confidence limit, 1 (STDEV): Nominal (measurand) reference values ± 0.13 R units
- For a 95% confidence limit, 2 (STDEV): Nominal (measurand) reference values ± 0.26 R units
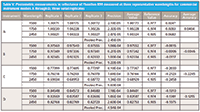
Table V: Photometric measurements in reflectance of Fluorilon R99 measured at three representative wavelengths for commercial instrument models A through D, three serial replicates
Although the within instrument photometric repeatability or precision might be considered reasonable for commercial NIR spectrometers from Tables II through IV, the accuracy as measured using a stable Fluorilon R99 reference material and comparing those results to measurand values is far from close. This is noted in Figures 1 and Tables I and V. Notice that reflectance (R) is on a scale of 0–1 and, thus, an error of 0.26 reflectance units for 95% confidence is quite significant. Clearly, several instrument manufacturers should address photometric correction as an important issue.
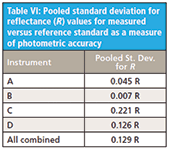
Table VI: Pooled standard deviation for reflectance (R) values for measured versus reference standard as a measure of photometric accuracy
References
(1) J. Workman and H. Mark, Spectroscopy 29(6), 18–27 (2014).
(2) Y. Wang, D.J. Veltkamp, and B. Kowalski, Anal. Chem. 63, 2750–2756 (1991).
(3) J. Workman Jr. and H. Mark, Spectroscopy 28(10), 24–33 (2013).
(4) J.S. Shenk, M.O. Westerhaus, and W.C. Templeton, Crop Sci. 25, 159–161 (1985).
(5) K.G. Nordqvist, U.S. Patent No. 4,944,589 (1990).
(6) J.S. Shenk and M.O. Westerhaus, Crop Sci. 31, 1694–1696 (1991).
(7) B.N. Taylor and C.E. Kuyatt, Guidelines for Evaluating and Expressing the Uncertainty of NIST Measurement Results, Technical Note 1297 (National Institute of Standards and Technology [NIST], Gaithersburg, Maryland, 1994).
(8) A. Springsteen, Spectroscopy 21(11), 14–16 (2006).
(9) V.R. Weidner, P.Y. Barnes, and K.L. Eckerle, J. Research NBS 91(5), 243–253 (1986).
Erratum
In our previous column (H. Mark and J. Workman Jr., Spectroscopy 29(9), 26–31 [2014]), the y-axis labels for Figures 7b, 8b, and 9b should be "Volume %"; the captions of the figures do correctly describe the plots. The corrected version can be found on-line at spectroscopyonline.com/Chemometrics+in+Spectroscopy+Column
Jerome Workman, Jr. serves on the Editorial Advisory Board of Spectroscopy and is the Executive Vice President of Engineering at Unity Scientific, LLC, in Brookfield, Connecticut. He is also an adjunct professor at U.S. National University in La Jolla, California, and Liberty University in Lynchburg, Virginia. His e-mail address is JWorkman04@gsb.columbia.edu

Jerome Workman, Jr
Howard Mark serves on the Editorial Advisory Board of Spectroscopy and runs a consulting service, Mark Electronics, in Suffern, New York. He can be reached via e-mail: hlmark@nearinfrared.com

Howard Mark
From Classical Regression to AI and Beyond: The Chronicles of Calibration in Spectroscopy: Part I
February 14th 2025This “Chemometrics in Spectroscopy” column traces the historical and technical development of these methods, emphasizing their application in calibrating spectrophotometers for predicting measured sample chemical or physical properties—particularly in near-infrared (NIR), infrared (IR), Raman, and atomic spectroscopy—and explores how AI and deep learning are reshaping the spectroscopic landscape.