What Does Performance Qualification Mean for Infrared Instruments?
When using infrared (IR) instruments in a regulated laboratory, it is essential to conduct meaningful performance qualification (PQ) tests to maintain compliance.
Performance qualification (PQ) tests are a vital component of the steps regulated laboratories do to maintain compliance. Therefore, it is essential to understand and apply meaningful PQ tests. However, what does PQ mean in practice for infrared (IR) instruments? The answer may surprise, or even horrify, you.
In last September’s “Focus on Quality” column, we presented an analysis of FDA 483 observations and warning letters for infrared instruments and analysis (1). In this article, we are returning to the original intent of our previous column, where we wanted to discuss performance qualification (PQ) for infrared instruments. One of the 493 citations we presented was on PQ and the failure to qualify or calibrate the instrument on an on-going basis:
No Performance Qualification (PQ) is required before use to ensure the performance of the <redacted> FT-IR (Fourier transform infrared); only the….. operation qualification is performed. In addition, the SOP # <redacted> does not require such
a test (2).
In this column, we discuss what PQ means and the relationship to the operational qualification (OQ) and the link between both OQ and PQ to the laboratory user requirement specification (URS). You have written a URS for your instrument, haven’t you? If not, please read an earlier “Focus on Quality” column about a URS for a spectrometer that will provide the principles for writing one (3).
Qualification vs. Calibration vs. Verification
Although EU GMP Annex 15 discussed qualification of equipment including analytical instruments (4), there is no such mention in 21 CFR 211, the US GMP regulations (5). Therefore, 483 observations by FDA inspectors will be for failure to calibrate an instrument as required by 21 CFR 211.160(b) (5).
This means that an FDA investigator will probably use the descriptive label calibration when asking about infrared instrument performance monitoring, but will be referring to the instrument testing carried out under qualification and throughout the instrument’s lifetime of use. The instrument performance that needs to be satisfied is defined in the infrared general chapters of the relevant pharmacopoeias. Unfortunately for infrared users, the general chapters are not harmonized, and this is frustrating, as well as being potentially confusing. For example, although there is broad agreement on the use of polystyrene as a suitable reference material for verification of the wavenumber scale with transmission spectra, there are differences in the properties of the polystyrene material described, as well as the limits applied to peak positions, when several pharmacopeias are compared. Overall, the main areas of difference are related to:
- Identification-by reference spectra versus by certified reference material
- Actions-what to do if differences are identified
- Wavenumber verification-what are the acceptance criteria or limits to be applied?
- Resolution-this is a requirement of European Pharmacopeia (EP) (6), but not of United States Pharmacopeia (USP) (7)
- Resolution-differences in measurement or limits.
Differences in instrument resolution requirements is the largest area of concern. Instrument resolution is not included in USP <854>, but is included in other major pharmacopeias. The EP specifies the limits in absorbance, while others that include resolution specify the limits in %T. This could mean that your instrument might pass or fail the limits, depending on the polystyrene film used for the test (8).
Many of these problems originate from the erroneous application of historical dispersive infrared performance data to Fourier-transform infrared (FT-IR) instruments, particularly for resolution tests. Fundamentally, with a dispersive infrared instrument, the signal-to-noise ratio is constant throughout the spectrum, but resolution changes, whereas, for an FT-IR instrument, the resolution is constant throughout the spectrum, but the signal-to-noise changes. This fundamental difference means that for some pharmacopeias, the polystyrene peak-to-trough limits between the 1583 cm-1 and 1589 cm-1 peaks could not pass the resolution limits for FT-IR spectra with equivalent “nominal” resolution to the dispersive instrument (4 cm-1 resolution, where the typical FT-IR measurement is closer to 10% T). This has been a significant source of historical confusion. Verification of the instrument performance is essentially in the form of monthly checks confirming that the instrument is fit for use, and typical parameters that may be required for FT-IR performance measurement are:
- wavenumber accuracy
- resolution
- signal-to-noise ratio (S/N) -important, but left to the end user.
Business Rationale for Analytical Instrument Qualification (AIQ)
Some laboratories, especially in research and development, may question the need for qualification of instruments, especially if there is a Six Sigma or Lean laboratory approach to working practices. Qualification may be perceived as an added cost or a non-added-value activity in some organizations. Let us look at some of the reasons why analytical instrument qualification (AIQ) is important from a business perspective:
- Good Science: If the instrument is not qualified or calibrated, how do you know it is working correctly? Unless you have the evidence from the qualification of traceability to national or international standards, how can you defend an analytical result?
- Best Practice: How well is the instrument performing? Has there been a change or drift in instrument performance?
- Integrity of R&D Data in the Registration Submission: Data and methods from R&D will be part of any regulatory submission that will be subject to a pre-approval inspection (PAI) (9,10). The ALCOA (Attributable, Legible, Contemporaneous, Original, Accurate) criteria are key to data integrity, and, if any analytical instrument is not adequately qualified and calibrated, then it is not fit for purpose.
- Ease of Technology Transfer: Anyone who has been on the receiving end of a method from R&D knows how easy it is to transfer a method into a production environment-not! If R&D instruments are not qualified, there can be a major problem and delays in transferring methods.
Regulatory Requirements and the 4Qs Model
The process of instrument qualification begins with the requirements in the good manufacturing practices (GMP) regulations, coupled with the instrument specifications and acceptance criteria in the pharmacopoeial mandatory general chapters. This generates an overarching list of attributes for an infrared instrument (or indeed any spectrometer) together with any accessories that are used with the instrument such as an attenuated total reflectance (ATR) sampling accessory.
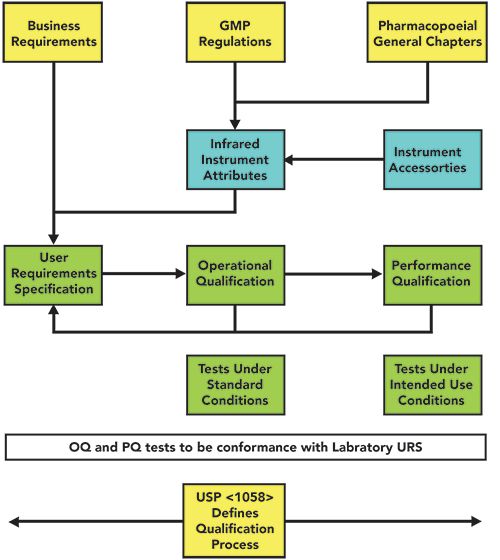
A laboratory user requirements specification (URS) should be written from these regulatory requirements, and not blindly copied from a supplier’s specification. The URS is the critical document in the whole analytical instrument qualification (AIQ) process and this is shown in Figure 1. USP <1058> provides the process for qualifying an instrument, and Figure 1 shows the close relationship between the URS, OQ, and PQ (11). Tests carried out in the OQ and PQ must be related either directly or indirectly to the requirements documented in the laboratory URS.
Figure 1: The relationship between regulatory requirements and analytical instrument qualification.
Direct tests use either a certified reference material or a calibrated instrument to measure an instrument parameter. For example, a suitable polystyrene film can be used for wavenumber verification (note that verification is used instead of calibration here, because peak positions are references to the internal laser in the instrument interferometer).
Roles and Responsibilities
Who is accountable and responsible for instrument PQ? A laboratory manager will be accountable overall, but the work may be divided between various parties, depending on the organization structure and internal policies, among the following individuals or groups:
• instrument supplier or local agent
• external third-party service provider
• internal metrology group
• company subject matter expert (SME)
• laboratory analysts.
Let us pose a question: If a laboratory performs its own AIQ (especially the operational qualification), is it a potential conflict of interest? We must point out that there is nothing in the regulations or pharmacopoeias to prohibit this “do it yourself” approach. However, there is a requirement for a combination of education, training, and experience for all staff to be able to perform their work (21 CFR 211.25) (5).
Where is the scientific expertise in a laboratory to write and approve the qualification protocols?
Therefore, if in-house qualification is performed, who is going to defend the qualification approach and tests to an inspector? This is especially so with an in-house prepared standard solution.
Regardless of how the qualification is performed, it is important that groups external to the laboratory are managed effectively through an agreement or contract that describes the responsibilities and tasks to be performed by each party (12). Additionally, some instrument specification or performance tests may only be performed by the instrument supplier.
A USP <1058> Refresher
United States Pharmacopoeia (USP) general chapter <1058> on Analytical Instrument Qualification (AIQ) was updated recently (13), and contains new requirements compared with the 2008 version. We published a three-part series for LCGC Europe on the impact of this new version for chromatography (11,14,15). The relationships between URS, OQ, and PQ are shown in Figure 1. The key point to make is that the most important document in the whole USP <1058> process is the user requirements specification (URS).
According to USP <1058>, the first activity is to define user requirements:
The first activity is the generation of an URS, which defines the laboratory’s particular needs and technical and operational requirements that are to be met (3).
This is harmonized with section 3.2 in EU GMP Annex 15 on Qualification and Validation (4), which says essentially the same. This is the definition of intended use of the instrument. USP <1058> also notes that for commercially available instruments (not software) the requirements are expected to be minimal (13).
Without an adequate URS, you cannot define the following:
- intended use of the instrument, as required by 21 CFR 211.63 (5)
- tests with ranges and acceptance criteria in the OQ to show that the instrument can meet the documented URS requirements
- PQ tests to carry out to demonstrate that the instrument continues to operate as expected and defined in the URS and under conditions of use, in particular the optical bench and if any accessories are used
The USP general chapter then states that the subsequent qualification activities necessary to establish fitness for purpose may be grouped into four phases: design qualification (DQ), installation qualification (IQ), operational qualification (OQ), and performance qualification (PQ) (13). Where appropriate, it is possible to merge phases, and this is consistent with EU GMP Annex 15 clause 2.5 (4); for some instruments a combined IQ/OQ would be a reasonable approach, such as analytical balance.
What is the Difference Between OQ and PQ?
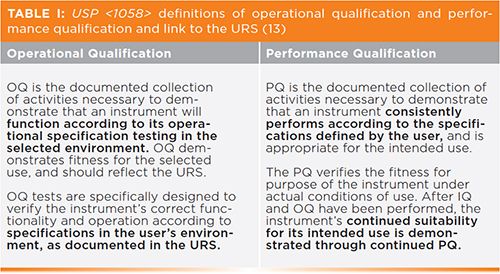
Before discussing what is a PQ for an infrared spectrometer, it is important to differentiate between the operational and performance qualification phases of AIQ. The two definitions are presented in Table I.
What are the implications of these two definitions?
- The order of activities is important: first, the OQ, to demonstrate that the instrument meets intended use requirements and then, the PQ (this may be stating the obvious to many readers, but it is important to reiterate).
- Both OQ and PQ are linked directly to the URS requirements for the instrument.
- No URS? Any OQ and PQ testing is irrelevant, as there is no specification to test against.
- PQ is not a single activity, but a continuous process showing that the instrument continues to meet intended use requirements documented in an up-to-date URS.
Therefore, it is possible to differentiate between OQ and PQ, but, as stated in Table I, PQ is a documented collection of activities, which is not the most helpful to readers who actually want to do something. However, as an approximation, the definitions shown in Table I mean that, for FT-IR instruments, OQ testing is associated with demonstrating that the performance of the instrument satisfies the requirements of infrared general chapters in the appropriate pharmacopeias. These are typically transmission tests, and are associated with performance of the optical bench and the transmission sample holder only. PQ is associated with performance of the instrument under conditions of use, so when using sampling accessories (including the transmission holder). The exception to this “rule” is attenuated total reflectance (ATR), where the European Pharmacopoeia also includes wavelength positions of polystyrene when measured using ATR (6).
The user requirements must specify the intended use of the instrument. Two important dimensions of that use include the types of analysis and identification.
Types of Analysis
There are two types of analysis:
- routine QC type material identification, or
- non-routine development or experimental research.
Identification
Identification can be done by:
- software algorithm
- human comparison of spectra.
These basic examples of possible instrument uses are important to differentiate, because they can impact instrument performance and data integrity requirements. If an instrument has been purchased for non-routine experiments or research studies, procedural control to satisfy data integrity requirements may be acceptable. However, instruments designed for QC compliance work should be capable of satisfying data integrity requirements without heavy reliance on procedural control. Equally, where a human will manually compare spectra as part of QC material identification, strong investment needs to be placed on essential infrared training and compliant use of infrared identification. The large number of non-compliance examples in our earlier publication indicates this is not the case (1). Where systems are set up and designed to generate pass/fail criteria based on automated spectral comparison, the investment focus will be more on validation of the software performance and include justification of the limits set.
Performance Qualification: More Details
Fear not, dear reader, USP <1058> has more information:
The user must define the PQ plans, including test procedures, acceptance criteria, and frequency. Preventive maintenance plans and documentation of repairs and other changes are also a necessary part of the overall instrument qualification (13).
And there’s more!
When the instrument undergoes major repairs or modifications, this should be evaluated using change control. Relevant IQ, OQ, and/or PQ tests should be repeated to verify that the instrument continues to operate satisfactorily (13).
Now we have more information to understand the complete scope of PQ:
- A test plan is a controlling document that determines the overall approach and frequency of PQ tests.
- There must be test procedures with test steps and acceptance criteria.
- An instrument needs a preventative maintenance (PM) plan.
- Instrument problems, repairs, and any requalification tests must be documented chronologically with use in the instrument log (5,16,17).
- Control of any changes to the instrument and system is essential.
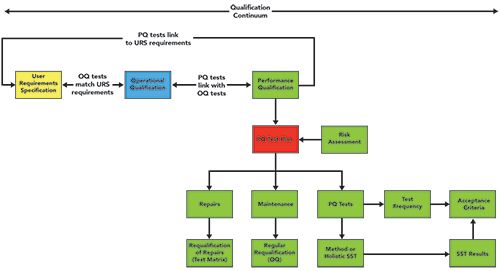
The test plan and all elements of a PQ can be seen in Figure 2. The critical understanding from this figure is that the PQ is not just associated with a particular instrument test, but it is also the link back from this phase of the 4Qs model to the URS to demonstrate continued performance of the instrument and system meets your documented specification.
Figure 2: Relationships between the various phases of the 4Qs model (15).
Because maintenance and repair are key components of the overall PQ test plan, they may need to be defined in the instrument life cycle, rather than waiting until the warranty period has expired.
URS and Analytical Workflow
Because the combination of preparing the sample to record an infrared spectrum or placing the sample in the instrument or accessory are manual processes, there is a risk that they are not performed well. For solid samples that require grinding to reduce the particle size, the quality of the infrared spectrum is directly related to sample preparation. Pharmacopeias such as European Pharmacopoeia 2.2.24 (6) include general guidance, such as:
a Mull is rejected if visual examination shows lack of uniform transparency or where the spectrum shows features such as:
- Low transmission at 4000 cm-1
- A strongly sloping baseline between 4000 and about 2500 cm-1
- A ratio of relative intensities of some absorption bands that is less than expected.
As well as the effects associated with poor grinding, which distorts the appearance of the spectrum (18), there is also the possibility that the spectrum is too weak (hard to see the peaks), or too strong (all the peaks are strongly absorbing). These possible problems are compounded by deskilling in the laboratory. Additionally, for ATR, the sample could also make poor contact with the ATR crystal, and give a weak spectrum. All these factors contribute to the critical decision required for infrared identification; is the quality of the sample preparation or spectrum appropriate for intended use? This decision must occur before the spectrum is compared with that of a suitable reference material.
One of the critical compliance sensitivities appropriate to this quality decision is how the information and decision are documented and if a laboratory investigation needs to be initiated. From a data integrity perspective, the simplest answer is yes, as this provides visibility of any problems associated with the analysis. Historically, this was not the case. Laboratories may have simply repeated the sample preparation, and deleted the poor-quality spectrum. Because of data integrity concerns associated with this activity, all spectra must be retained, and the workflow associated with use of the instrument must be designed to prevent deletion of data, or the laboratory will be challenged from a data integrity perspective during a regulatory audit or inspection (1,11).
One essential component of an infrared workflow is to ensure that spectra can’t be recorded without saving the data. Some infrared instruments may include options that support monitoring or preview of spectra, while others can change the way saved spectra are presented to an unknowing reader; features such as these should be carefully understood from a data integrity perspective.
Risk Assessment
When considering risk assessment for an FT-IR instrument, possible instrument failure modes include:
- catastrophic
- intermittent
- out of tolerance
- quantification.
The failure modes affect both the detectability and the potential impact of the failure on analytical results. Catastrophic failures prevent the instrument from being used, so effectively, there is no impact on analytical results, because the instrument cannot be used when the failure is present. This would still need to be documented and justified, and information related to instrument repairs can be used to support this classification and impact assessment. For intermittent and out-of-tolerance failures, the scale of the impact would depend on how the instrument was being used. For quantitative measurements, assuming the FT-IR instrument is being used with a chemometric model, a key component of the model prediction is to also indicate a goodness of fit for the chemometric model.
When using infrared spectroscopy for routine material identification, the risks can be considered from a potential impact on the spectroscopic data. These risks are essentially mitigated by training and a detailed standard operating procedure (SOP) that provides guidance to the user during routine use and a well thought out workflow that looks at these risks and identifies what actions to take to prevent or mitigate:
- poor S/N
- contamination of the accessory
- or sample
- poor quality sample signal
- poor quality sample spectrum
- water vapor interference.
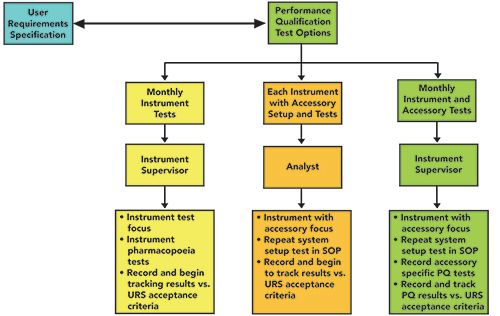
The different aspects of FT-IR instrument testing is perhaps one of the best examples of the continuum of qualification testing (14) that includes the OQ, periodic PQ testing, and user-defined point-of-use PQ testing, as shown in Table II and Figure 3.
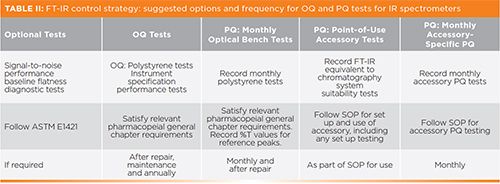
Figure 3: A suggested approach to PQ testing for IR spectrometers.
Pharmacopeias do not provide guidance or limits on the S/N performance of instruments. Therefore, users must determine scan conditions for routine use that use appropriate resolution, apodization during the Fourier transform, and number of scans to signal average. Users that want to read more detail about monitoring the S/N performance of instruments are referred to ASTM Method E1421-99 (19). It should be noted that S/N of an FT-IR spectrum is proportional to the square root of the number of scans. Therefore, increasing the number of scans (of the sample and the background spectrum) will improve the S/N of the spectra. Conditions should be used that satisfy drug monograph testing and general chapter requirements that result in spectra of appropriate quality and signal to noise. The performance of the instrument should be evaluated under conditions of use, ideally in the intended laboratory prior to purchase. The ability of a supplier to support on-site evaluation will be indicative of their ability to support the instrument post purchase.
For transmission and ATR measurements, polystyrene can be used as a suitable reference material. However, 2.2.24 of the EP states (6):
For measurement modes other than transmission or ATR, reference materials must be defined by the user.
This means that, for transmission and ATR sampling accessories, polystyrene could be used to document the instrument performance, but, for other sampling accessories (such as diffuse reflectance), the user must define materials that are suitable to document the instrument performance. This interpretation is in line with USP <1058> interpretation of PQ requirements.
Managing Regulatory Expectations
Whatever tests a laboratory decides to do in order to qualify and calibrate an FT-IR system, it will need to defend the work and the suitability of the instrument during regulatory audits and inspections. As part of preparing to do this, it can be beneficial to consider the overall control strategy the laboratory has defined and not just specific tests or the qualification. Frequently, the questions that are hardest to answer during an audit or inspection are the ones that haven’t been considered. The citation at the start of this article was related to a lack of a PQ being performed before the instrument was used. From the authors’ experience, many laboratories do not address PQ requirements. In principle, because polystyrene-based tests are easy to perform, a laboratory could define these as the PQ and perform the tests each time the instrument is used. This would essentially mean the instrument was being qualified every time it was used, when it is not necessary to do so.
Fundamentally, the position of the moving mirrors in FT-IR instruments usually rely on an internal laser that creates a sine wave signal when it passes through the interferometer. In principle, this results in a theoretical wavelength accuracy of 0.01 cm-1 (based on a He:Ne laser). This means that the wavenumber scale is internally referenced to the internal laser. In practice, for samples, there are a variety of possible errors that can result in much larger wavenumber errors (20). Also, for instruments that use a diode laser, the frequency of the laser may be temperature dependent. Therefore, it is significantly more robust and easier to defend in an audit to test the wavenumber scale of the instrument periodically with a traceable reference standard, such as polystyrene; however, referring to the internal laser as part of the control strategy would form part of the instrument defense.
Another potential component of instrument performance is verification of photometric response. A calibrated reference standard is available based on an optically worked filter of Schott NG11 optical glass (21). In the opinion of the authors, for FT-IR instruments that are being used for material identification, it is not necessary to verify the %T scale of the instrument, because the %T values for the polystyrene film peaks used to verify wavenumber performance could be monitored at the same time. However, where FT-IR instruments are used to measure optical properties of materials, use of the Schott glass is recommended.
Some FT-IR instruments may require instrument maintenance procedures to ensure continued optimum performance of the system. Examples of this user maintenance could include:
- re-alignment of the interferometer (if not dynamically aligned)
- purging the interferometer with nitrogen or dry air
- regeneration of desiccant used to ensure there is no moisture ingresses to damage the windows, optics or beam splitter.
Where such user maintenance is carried out, the laboratory needs to consider the appropriate sequence or workflow in relation to Table II.
USP <1058> Summary
The key issues from a good understanding of USP <1058> are that:
- Users must write a meaningful and testable user requirements specification (URS) that contains the operating parameters for the IR spectrometer and the instrument software.
- These parameters are verified in the operational qualification (OQ)
- Performance qualification (PQ) needs tests that either directly or indirectly confirm that the instrument continues to operate in compliance with the operating parameters in the URS (13)
The difference between an instrument OQ and PQ is typically the area of greatest discussion when considering analytical instrument qualification. It is important to first understand that because an OQ and PQ test different attributes of instrument performance and both are required.
Uniquely for FT-IR, the subject of calibration also needs to be considered because of confusion that can arise due to the interpretation of this word (calibration vs. qualification).Firstly, in simple terms, the instrument performance attributes that are associated with an OQ and PQ are:
- OQ: Documents how the instrument satisfies user requirements before operational release and at regular intervals, typically after an annual preventative maintenance service.
- PQ: Demonstrates the instrument continues to work under actual conditions of use.
Tests performed on analytical instruments during qualification typically fall under the following categories:
- metrology-based tests (not needed for an FT-IR instrument, unless temperature controlled)
- reference material–based tests
- detector- or noise-based tests
- usage-based tests (recording spectra).
Summary
Despite the fact that infrared spectroscopy is a long-established analytical technique, there is variation in pharmacopeial requirements, and uncertainty over how to interpret and satisfy these requirements in routine use and during analytical instrument qualification. This uncertainty was reflected in the number and variety of FDA citations, warning letters, and observations discussed in our September 2019 article (1). Ultimately, users are responsible for AIQ and for defining, executing, and defending meaningful PQ test plans in particular. This includes defining and approving different elements of monitoring performance during the instrument life cycle (annual operational qualification, followed by three different PQ components: monthly optical bench testing with polystyrene, monthly infrared accessory testing with appropriate reference materials, and appropriate point-of-use set-up testing for each kind of infrared accessory used). The first two PQ requirements would typically be included in an instrument qualification SOP or document, while the last would be included in an SOP for routine use of the instrument.
The lack of harmonization for FT-IR in pharmacopeia general chapters is frustrating and complicates interpretation of qualification requirements. When technique-specific general chapters were first introduced into the USP for spectroscopy, for example USP <854> and USP <1854> (7,18), this presented an opportunity for the USP to take a leading role in defining requirements and influencing other pharmacopeias to follow. Wavelength accuracy was finally included, but instrument resolution was not. A discussion about how to respond to an FDA inspector who asks about instrument resolution when it is not part of the USP will be left to another day. In this article, it has not been possible to provide detailed definitive guidance, particularly over PQ requirements. Instead, we have tried to provide a framework for users to understand how to interpret the changes in the updated version of USP <1058> (13) when applied to FT-IR instruments. There are differences of opinion over interpreting OQ and PQ requirements, but ultimately, it is the laboratory’s responsibility to explain how qualification or calibration practices address these requirements.
References
- P.A. Smith and R.D. McDowall, Spectroscopy, 34(9), 22–28 (2019).
- FDA 483 Observations, Fresenius Kabi Oncology, India, 24 May 2017, FEI 3003519498 (Food and Drug Administration, Silver Spring, Maryland, 2017).
- R.D. McDowall, Spectroscopy 33(4), 12–16 (2018).
- EudraLex - Volume 4 Good Manufacturing Practice (GMP) Guidelines, Annex 15 Qualification and Validation (European Commission: Brussels, Belgium, 2015).
- 21 CFR 211 Current Good Manufacturing Practice for Finished Pharmaceutical Products (Food and Drug Administration, Sliver Spring, Maryland, 2008).
- EP 2.2.24 Absorption Spectrophotometry, Infrared (European Pharmacopoeia, Strasbourg, France).
- USP General Chapter <854> Mid-Infrared Spectroscopy (United States Pharmacopoeia, Rockville, Maryland).
- R.A. Hoult, B. Perston, and R.A. Spragg, Spectroscopy 28(2), 38–43 (2013).
- FDA Compliance Program Guide CPG 7346.832 Pre-Approval Inspections (Food and Drug Administration, Sliver Spring, Maryland, 2019).
- R.D. McDowall, Spectroscopy 34(12), 14–19 (2019).
- P. Smith and R.D. McDowall, LCGC Europe 31(7), 385–389 (2018).
- EudraLex - Volume 4 Good Manufacturing Practice (GMP) Guidelines, Chapter 7 Outsourced Activities (European Commission, Brussels, Belgium, 2013).
- USP 41 General Chapter <1058> Analytical Instrument Qualification (United States Pharmacopoeia Convention, Rockville, Maryland, 2018).
- P. Smith and R.D. McDowall, LCGC Europe 31(9), 504–511 (2018).
- P. Smith and R.D. McDowall, LCGC Europe 32(1), 28–32 (2019).
- EudraLex-Volume 4 Good Manufacturing Practice (GMP) Guidelines (Chapter 4 Documentation, E. Commission, Editor, Brussels, Belgium, 2011).
- R.D. McDowall, Spectroscopy 33(4), 12–16 (2018)
- USP General Chapter <1854>Middle Infrared Spectroscopy - Theory and Practice (Rockville, Maryland).
- ASTM E1421 - 99 (2015) e1 Standard Practice for Describing and Measuring Performance of Fourier Transform Mid-Infrared (FT-MIR) Spectrometers: Level Zero and Level One Tests (ASTM International, West Conshohocken, Pennsylvania, 2015).
- L.M. Hanssen and C. Zhu, Wavenumber Standards for Mid-infrared Spectrometry, in Handbook of Vibrational Spectroscopy J.M. Chalmers and P.R. Griffiths, Eds. (John Wiley and Sons, Chichester, United Kingdom, 2002).
- C.J. Chunnilall, et al., Metrologia 40, S55–S59 (2003).

R.D. McDowall is the director of R.D. McDowall Limited and the editor of the “Questions of Quality” column for LCGC Europe, Spectroscopy’s sister magazine. Direct correspondence to: SpectroscopyEdit@MMHGroup.com

Paul Smith is the director of is a Global Strategic Compliance Specialist at Agilent Technologies. After initially specializing in spectroscopy and application of chemometrics to spectroscopic data, Paul developed his compliance expertise in a variety of quality and management roles within the 17 years he spent in the pharmaceutical industry. Paul worked as an independent consultant and university lecturer before moving into laboratory compliance consultancy roles.
