Analysis of Organic Chlorides in Crude by ASTM D4929, PART C
The analysis of organic chloride in crude is demonstrated per ASTM D4929 Part C using Monochromatic EDXRF (MEDXRF).
Chlorides in crude contribute to corrosion in the piping at refineries during cracking as well as mid-stream in pipelines. Organic chlorides do not naturally occur in crude, however inorganic chlorides in the form of salts as well as residual organic chlorides from various natural sources as well as adulteration can contaminate crude. Contracts at the pipelines may contain clauses limiting the amount of organic chloride allowed in the crude. And at the refinery after desalting and desulfurization, crude needs to be analyzed for any residual organic chlorides possibly still entrained in the feedstock to avoid potential damage during the refining process.
Experimental Conditions
Instrumentation
Type: Monochromatic EDXRF (MEDXRF) 90° Cartesian Geometry Polarization
Model: Rigaku NEX CG
X-ray tube: 50 W Pd-anode
Detector: Silicon drift detector (SDD)
Sample tray: 15-position Autosampler
Film: Polypropylene (4 um)
Analysis Time: 300 s
Environment: Helium
Sample Preparation
ASTM D4929 is designed for the measurement of residual organic chlorides in crude. The crude sample is first prepared by distillation and wash to remove H2S and inorganic chlorides. After distillation and wash processes the resulting naphtha fraction is analyzed for Cl content by XRF using Part C methodology. The naphtha fraction is typically stable containing less than 1000 mg/g S. XRF calibration is made using mineral oil calibration standards, as mineral oil models naphtha for X-ray response.

To prepare a sample for XRF analysis simply place 4.0 g of the naphtha sample in a standard 32-mm XRF sample cup and measure directly.
ASTM D4929 Calibration: Part C XRF
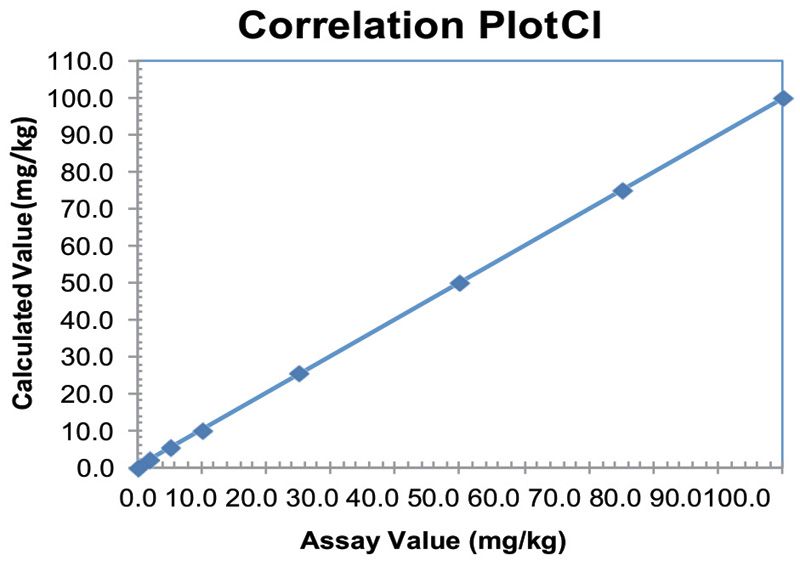
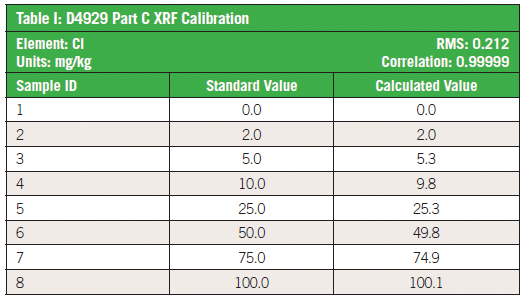
Empirical calibration was made using commercially available mineral oil standards. For optimum calibration, the standards contain both S and Cl, with S content ranging from 100 to 1000 mg/kg (Table I). Alpha corrections are automatically employed to compensate for sulfur's effect on chlorine X-rays.

Precision and Repeatability
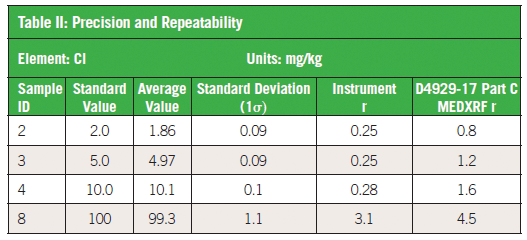
To demonstrate recovery, precision, and repeatability of the measurement, a few calibration standards were selected with results shown in Table II.

Detection Limits
The empirical method is used to determine detection limits using 300 s measurement time. Ten repeat analyses of a blank mineral sample are taken with the sample in static position and the standard deviation (σ) is determined. The lower limit of detection (LLD) is then defined as three times the standard deviation (3 σ) as in Table III.

Conclusions
The performance shown here demonstrates NEX CG provides excellent sensitivity and performance for the measurement of chromium conversion coatings on aluminum.

Applied Rigaku Technologies, Inc.
9825 Spectrum Drive, Bldg. 4, Suite 475, Austin, TX 78717
tel. (+1) 512-225-1796
Website: www.RigakuEDXRF.com

How Do We Improve Elemental Impurity Analysis in Pharmaceutical Quality Control?
May 16th 2025In this final part of our conversation with Harrington and Seibert, they discuss the main challenges that they encountered in their study and how we can improve elemental impurity analysis in pharmaceutical quality control.
How do Pharmaceutical Laboratories Approach Elemental Impurity Analysis?
May 14th 2025Spectroscopy sat down with James Harrington of Research Triangle Institute (RTI International) in Research Triangle Park, North Carolina, who was the lead author of this study, as well as coauthor Donna Seibert of Kalamazoo, Michigan. In Part I of our conversation with Harrington and Seibert, they discuss the impact of ICH Q3D and United States Pharmacopeia (USP) <232>/<233> guidelines on elemental impurity analysis and how they designed their study.
LIBS Illuminates the Hidden Health Risks of Indoor Welding and Soldering
April 23rd 2025A new dual-spectroscopy approach reveals real-time pollution threats in indoor workspaces. Chinese researchers have pioneered the use of laser-induced breakdown spectroscopy (LIBS) and aerosol mass spectrometry to uncover and monitor harmful heavy metal and dust emissions from soldering and welding in real-time. These complementary tools offer a fast, accurate means to evaluate air quality threats in industrial and indoor environments—where people spend most of their time.

.png&w=3840&q=75)

.png&w=3840&q=75)


.png&w=3840&q=75)


.png&w=3840&q=75)


