Application of Miniature X-ray Sources to Residual Stress Measurements
Spectroscopy
Miniature X-ray sources reached the development level that is appropriate for their use in the hand held and portable X-Ray diffraction (XRD) instruments. This note describes the application of X-ray sources for the residual stress measurements using XRD.
Miniature X-ray sources reached the development level that is appropriate for their use in the hand held and portable X-Ray diffraction (XRD) instruments. This note describes the application of X-ray sources for the residual stress measurements using XRD.
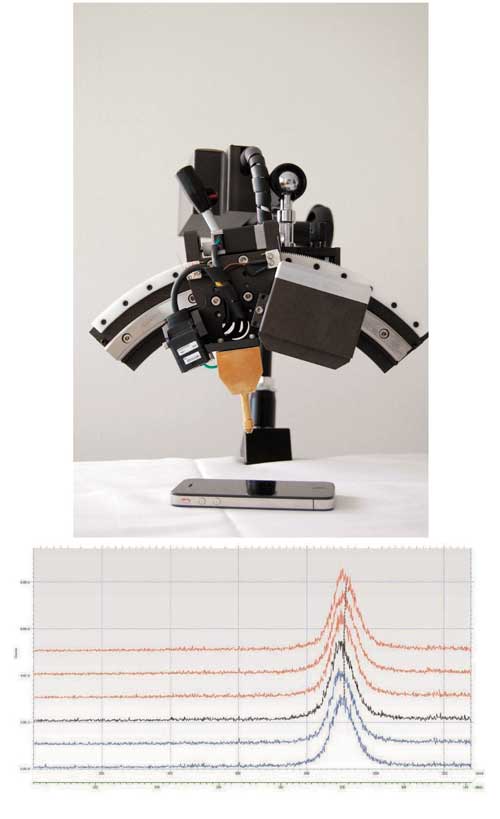
XRD is a well-accepted method for measuring the surface and sub-surface residual stresses in polycrystalline materials such as iron, aluminum, and titanium alloys. Measuring the stress tensor requires that there is a series of relative motions between the object and the measuring head. The measuring head consists of an X-ray source and a position sensitive detector, Figure 1 (top). While measuring the residual stresses on actual components, such as gears, shafts, blades, steel structures, and rails, the only practical solution is to rotate the measuring head while the object is stationary. If the area position sensitive detector is employed the tube and detector do not need to move with respect to the object and this lends itself for a hand-held instrumentation (1,2). There are multiple portable XRD instruments on the market with the most compact ones weighing below 10 kg and the sample to detector distances from 50 mm to 120 mm. Such a small instruments require that the X-ray tube and high voltage power supply (HVPS) are small and light. They need to provide an X-ray flux appropriate for the fast and precise measurement, Figure 1 (bottom). The X-ray tube focal spot needs to be centered on the X-ray exit window, small and stable in order to assure that the X-ray beam passing through the collimation system hits the sample at the center of rotation of the diffractometer at all rotations during the measurement sequence. The X-ray beam position stability and small size are also of primary concerns for instruments using area detectors; beam hitting the sample off the center of alignment will result in serious problems with accuracy of measurements. The bottom part of Figure 1 shows that the peak position does not shift with six consecutive tilts of the measuring head which is the ultimate confirmation that the alignment of the goniometer is correct. For the XRD applications the tubes need to have an appropriate target materials for the analysis of different alloys; three most common ones are Cu (for aluminum alloys), Cr (for steels), and Ti (for Ti alloys).

Figure 1: Top: Portable XRD residual stress instrument. Sample to detector distance is 85 mm. Bottom: X-ray diffraction spectra collected through a 1 mm collimator at six different tilts. Data collection: Cr target, Fe powder, tube power 30 kV, 0.15 mA (4.5 W), collection time 40 s (the collection time is equivalent to that of a 300 W tube in a conventional XRD set-up). Courtesy to DFP Technologies.
References
- B.B. He et al., U.S. patent 646,847 B2 , 12 January 2010.
- G. Borgonovi, U.S. patent 4,489,425, 18 December 1984.

Moxtek, Inc.
452 West 1260 North, Orem, UT 84098
tel. 801-225-0930, fax 801-221-1121
Website: www.moxtek.com
