A Quantitative Analysis of Neodymium and Samarium at Low Pressure by Laser-Induced Breakdown Spectroscopy
In a quantitative analysis by laser-induced breakdown spectroscopy (LIBS), the minimization of white noise is a very important problem. The LIBS measurement was carried out to derive an optimized measurement condition with minimum white noise at low pressure. The thinner the ambient gas becomes, the larger the size of the plasma sphere becomes. The growth of the plasma started at a gas pressure of 15.0 Torr, and the plasma was slightly distinguishable by the inner sphere and the outer sphere at a pressure of 900 mTorr. It was clearly distinguishable at a pressure of 600 mTorr, and the sphere size was about 20.0 mm at this pressure. The measurement of the plasma was taken at a 6.0-mm distance, in the direction of a plasma sphere, from a sample. This location belongs to the outer sphere region in the plasma. Four Nd and Cu mixed samples and five Sm and Cu mixed samples that had mutually different components were prepared in an arc melting furnace at 3000 ?C, starting with a homogeneously mixed powder form of..
When the output from a pulsed laser is focused onto a small spot on a surface in a buffer gas or atmosphere environment, the temperature of the locally heated region rises rapidly to the vaporization temperature of the material and then an optically induced plasma, called a laser-induced plasma (LIP), is formed on the surface. This plasma will be formed when the laser power density exceeds the breakdown threshold value of the surface (1–6). Laser-induced breakdown spectroscopy (LIBS) is a laser-based sensitive optical technique used to detect certain atomic and molecular species by monitoring the emission signals from an LIP. The LIBS technique has been applied for the direct qualitative and quantitative determination of the composition of a wide range of different matrices such as solids, liquids, and gaseous samples. Among the applications of the LIBS, an elemental composition analysis of a metallurgical sample has been the most popular because the LIBS technique has an inherent capability to perform a direct solid sample analysis without any laborious chemical preparation. The spectrally and temporally resolved detections and the subsequent determinations of the specific atomic emissions will reveal analytical information about the elemental composition of a sample. Its attractive features, including minimal sample preparation, fast analysis speed, and operational simplicity, and its inherent capability of analyzing all kinds of materials regardless of their physical form and aggregate state open up wide opportunities for using this technique in industry and in environmental and biological sciences (7).
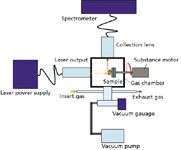
Figure 1: Schematic of the LIBS system.
In view of the IAEA Safeguards implementation for nuclear materials, the LIBS method has the advantage of a timely analysis of multiple elements in a sample taken from a nuclear fuel cycle process when compared to a time-consuming, chemical analysis method. Also, LIBS with fiber optics could be a promising method for measuring sensitive nuclear material (such as uranium, plutonium, and curium) in a high-radiation environment such as a hot-cell.

Figure 2: Measurement conditions.
In a quantitative analysis using LIBS, white noise was a problem. The white noise was generated by the plasma formation conditions and the emission wavelengths, surfaces, and matrices of the sample (8). The serious signal fluctuation was caused with only micro white noise. As a general rule, the white noise was decreased by using a delay time generator. But, the white noise did not completely disappear by using this method. So the measurement was performed in low-pressure conditions to minimize the white noise; it almost never appeared at low pressure. A quantitative analysis using LIBS has two important issues in a vacuum. First, the measurement conditions for a high fluctuation of an LIP must be optimized during an actual experiment. It is necessary because of the environmental gas condition, the sample preparation process, and the vibration around the equipment. Second, the positioning of the measurement location in a plasma sphere is very important. The plasma sphere is enlarged by the rarefied air, and it is discriminated by the inner sphere and the outer sphere. The inner sphere is brighter than the outer sphere, and it has been shown that the ion particles are superior in number to the neutral atoms. On the contrary, the neutral atoms are superior to the ions in the outer sphere. It is thus proper that the measurement is executed in the relatively stable outer sphere (1–4).

Table I: Description of the Nd mixed samples
This study is focused upon stabilizing a plasma sphere to enhance the accuracy of LIBS and to determine an optimum measuring position of the plasma sphere based upon the quantitative analysis of an ordinary metal (Cu, Cr, and Ni) at low pressure. The quantitative analysis of Nd and Sm was executed in the obtained measurement condition.

Table II: Description of the Sm mixed samples
Experimental and Results
Instrumentation: The LIBS system employed the following major components: a pulsed laser, a gas chamber, an emission spectrometer, a detector, and a computer. Figure 1 shows the LIBS system that was used for the experiment in the laboratory. The laser was a pulsed and Q-switched Nd:YAG laser operating at its fundamental wavelength of 1064 nm, with an output energy of 50.0 mJ. This laser generates a pulse duration of 6–8 ns, and has an energy stability of 2%, a repetition frequency of 20 Hz, and a beam diameter of 2.8 mm. The gas chamber was manufactured with SUS material with three built-in directional quartz windows, and the light emitted from the plasma was collected at a 90° angle by an optical fiber terminated by using a lens. The opposite side of the laser beam input window was fastened by a sample supporter. A low-speed motor was installed to minimize a sample surface damage by a high-energy laser beam and to complete for the inhomogeneity of the samples. The spectrometer was an Ocean Optics HR2000+ spectrometer (Dunedin, Florida), which included a CCD-type detector with a combined 2048 pixels per spectrometer with a resolution of 0.1 nm (FWHM), and an integration time of 2.1 ms. The detection range of the spectrometer was 300–600 nm, and the input signal was delivered by a 2-m multimode optical fiber. The whole system was controlled by computer. A dark image was collected for background subtraction. The data were displayed and converted by the OOILIBS program (Ocean Optics), and analysis of the data was executed by OriginPro7.
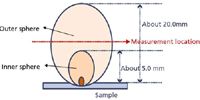
Figure 3: The measurement positioning process.
Sample Preparation
A measurement for the lanthanide sample was carried out on Nd and Sm before a measurement of the actinium elements from a standpoint of the IAEA safeguards. Four ingot samples that had mutually different components were prepared in an arc melting furnace at 3000 °C starting with a homogeneously mixed powder form of Nd and Cu. Five ingot samples were created from the mixed powder of Sm and Cu using the same method. Here, Cu is the reference element for each mixed sample and it was composed at an equal quantity. All of the prepared Nd samples had a thickness of 4.61 mm, and Sm samples were prepared for a thickness of about 3.65 mm. Tables I and II show the component ratio of manufactured neodymium mixed samples and samarium mixed samples, respectively.

Table III: The measurement conditions
Optimization of the Measurement Condition: The optimized measurement condition was found to be at 50 shots and an output energy of 25.0 mJ with a gradual increase of the laser power at which the reproducibility was the highest. The ambient gas was sustained at 490 ± 10 mTorr in a low pressure to stabilize a plasma sphere. When helium ambient gas at a pressure of 760 Torr was used, the signal reproducibility was the highest (9). But, we used the low-pressure to divide the plasma into the inner sphere and the outer sphere in the plasma. The white noise didn't appear at low pressure. To obtain a signal with a high reproducibility, a low-speed motor was introduced to cause less damage to a sample's surface by a high-energy laser beam. Table III and Figure 2 show the measurement conditions.
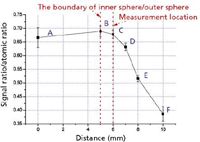
Figure 4: Signal variation for the measurement location.
The reproducibility of the signal intensity (peak counts) was obtained between 0.35% and 6.83% of the relative standard deviation (RSD) for the Fe, Ni, Zn, Cu, Nd, and Sm samples at the optimized measurement condition.
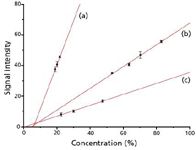
Figure 5: Calibration curves for (a) Cr, 425.4 nm; (b) Cu, 510.6 nm; and (c) Ni, 503.5 nm.
The Measurement Positioning of the Plasma Sphere: The LIP appeared with a very small flashing light in the air atmosphere. But, the fluctuation of signals was seriously increased by the white noise. So, we carried out a measurement at low pressure to minimize the white noise, and it almost never appeared at low pressure. The thinner the ambient gas becomes, the larger the size of the plasma sphere becomes. As a result of the study, the growth of the plasma started at a gas pressure of 15.0 Torr, and the plasma was slightly distinguishable by the inner sphere and the outer sphere at a pressure of 900 mTorr. It was clearly distinguishable at a pressure of 600 mTorr, and the sphere size was about 20.0 mm at this pressure. The boundary of the distinction between the inner sphere and the outer sphere was about a 5.0-mm distance in the direction of a plasma sphere from a sample's surface. Therefore, the measurement was made at a 6.0-mm distance in the direction of a plasma sphere from a sample, in the outer sphere region in the plasma. The signal intensity decreased rapidly after this 6.0-mm distance. Figure 3 shows the measurement location for the actual experiment, and Figure 4 shows a signal intensity variation (relative ratio) for the measurement location. Here, the relative ratio was calculated to assess the integrity of the measurement values; it was calculated as


Figure 6: The LIP of the mixed samples: (a) MS-01, (b) Sm-02.
A Quantitative Analysis of the Ordinary Metals: Under the optimized measurement conditions, an accuracy of the LIBS measurements was confirmed with the ordinary metals such as Cu, Cr, and Ni. In the case of Cr, the measurement was carried out with the SUS 300 series (301, 302, 304, and 316L), and the measurements of Ni and Cu were carried out with three Cu–Ni alloy sheets from Nilaco, Inc. (Japan). The linear regression R2 was more than 0.99 for these elements, and measurement errors were acquired by below 4%. The reference errors for Cu, Cr, and Ni were at 1–4% (10). Figure 5 shows the calibration curve of Cu, Cr, and Ni.

Table IV: The integrity of the LIBS
Measurement and Analysis for Neodymium and Samarium Mixed Samples: The measurement was made in the range of 400–600 nm signals for the Nd and Sm mixed samples. The signals were taken selectively based on a nonoverlapping response and the highest reproducibility. The standard signals were determined as 430.4 nm for Nd, 488.3 nm for Sm, and 510.6 nm for Cu. Figure 6 shows an LIP of the Nd and Sm mixed samples. Figures 7 and 8 show LIBS spectra of the mixed samples. The white noise of spectrum was minimized by the vacuum conditions.
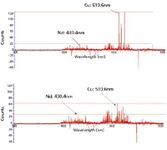
Figure 7: The LIBS spectra of Nd-mixed samples: MS-01 (upper), MS-03 (lower).
Each measurement was performed after 50 laser ablations under the same conditions and repeated 10 times. The integrity of the equipments was carried out through a calculated relative ratio (1), and the statistical data from the Nd mixed samples is shown in Table IV. Here, the mean is the statistical value of the relative ratio, and the measurement was satisfied with a normal distribution, since the p-value was 0.05 or more.

Table V: The linear regression of the Cr, Cu, and Ni calibration curves
An analysis of the measurement was undertaken by an acquisition of the calibration curve that was calculated by a concentration of Nd (or Sm) versus the signal intensity of Nd (or Sm), and the results are shown in Figure 9. The linear regression for Nd was R2 = 0.9913. The slope of the curve was 0.2246, and the confidence limit of the analysis was determined as 95%. The linear regression for Sm was R2= 0.9535. The slope of the curve was 1.2818, and the confidence limit of the analysis was determined as 95%. The linear regression results are shown in Tables V and VI. The reference error of Nd was 4%, and the reference error of Sm was 3% (10). As a result, the LIBS accuracy for Nd was little improved by the positioning of a measurement location.

Table VI: The linear regression of the Nd and Sm calibration curves
Conclusion
A real-time quantitative analysis of samples is possible with LIBS. The reproducibility of the LIBS analysis is within 3.83% by a proper adjustment of the laser output, the plasma environment such as the ambient gas, and the sample geometry. In a quantitative analysis by the LIBS, the minimization of white noise is a very important problem, and it can be minimized in a vacuum. The plasma was distinguished for the inner sphere and the outer sphere, and it was clearly distinguishable at a pressure of 600 mTorr. It is thus proper that the measurement is executed with relative stability in the outer sphere. The measurement values were satisfied with a normal distribution. The signal intensity was found to be proportional to the concentration of the sample. A linear regression analysis was carried out, and then the R2 values for Nd and Sm were determined to be 0.9913 and 0.9535, respectively.
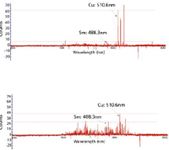
Figure 8: The LIBS spectra of Sm-mixed samples: Sm-01 (upper), Sm-04 (lower).
Further study is needed to enhance the measurement accuracy on the quantitative analysis for the lanthanide samples (Nd, Sm, and Gd) and uranium samples.

Figure 9: Calibration curves for Nd (upper) and Sm (lower).
Seung-Hyun Kim and Ki-Ju Yee are with the Graduate School of Analytical Science and Technology (GRAST), Chungnam National University, Daejeon, Korea. June-Sik Ju, Hee-Sung Shin, and Ho-Dong Kim are with Korea Atomic Energy Research Institute, Daejeon, Korea.
References
(1) Y.I. Lee, K.S. Song, and J. Sneddon, Laser-Induced Breakdown Spectrometry (Nova Science Publishers Inc., Huntington, New York, 2000).
(2) L.J. Radziemski and D.A. Cremers, Laser-induced Plasmas and Applications (Marcel Dekker Inc., New York and Basel, 1989).
(3) H.K. Cha, K.S. Song, and D.H. Kim, Development of Atomic Spectroscopy Technology: Development of Ultrasensitive Spectroscopic Analysis Technology (KAERI, Korea, 1997), pp. 69–89.
(4) H.K. Cha, K.S. Song, and Y.J. Rhee, Development of Atomic Spectroscopy Technology: Development of Ultrasensitive Spectroscopic Analysis Technology (KAERI, Korea, 1994), pp. 97–131.
(5) J. Sneddon, Y.I. Lee, and K.S. Song, "Laser-Induced Breakdown Spectrometry: Potential in Biological and Clinical Samples," in Advances in Atomic Spectroscopy, Ch. 6 (Elsevier Science B.V., Amsterdam, 2002).
(6) Y.I. Lee, Development of Real Time Monitoring Technology for Laser Photoreaction (KAERI, Korea, 2000).
(7) G. Galbacs, I.B. Gornushkin, B.W. Smith, and J.D. Winefordner, Spectrochim. Acta Part B 56, 1159–1173 (2001).
(8) L. Sun and H. Yu, Spectrochim. Acta Part 64, 278–287, (2009).
(9) S.H. Kim, Accuracy Improvement of LIBS for Plasma Sphere Control (CNU, Korea, 2008).
(10) T. K. Li, S.Y. Lee, M.C. Miller, M.T. Swinhoe, J.B. Marlow, and H.O. Menlove, Safeguardability of Advanced Spent Fuel Conditioning Process (Kaeri, Korea, 2006), pp. 40–49.
LIBS Illuminates the Hidden Health Risks of Indoor Welding and Soldering
April 23rd 2025A new dual-spectroscopy approach reveals real-time pollution threats in indoor workspaces. Chinese researchers have pioneered the use of laser-induced breakdown spectroscopy (LIBS) and aerosol mass spectrometry to uncover and monitor harmful heavy metal and dust emissions from soldering and welding in real-time. These complementary tools offer a fast, accurate means to evaluate air quality threats in industrial and indoor environments—where people spend most of their time.
NIR Spectroscopy Explored as Sustainable Approach to Detecting Bovine Mastitis
April 23rd 2025A new study published in Applied Food Research demonstrates that near-infrared spectroscopy (NIRS) can effectively detect subclinical bovine mastitis in milk, offering a fast, non-invasive method to guide targeted antibiotic treatment and support sustainable dairy practices.
Smarter Sensors, Cleaner Earth Using AI and IoT for Pollution Monitoring
April 22nd 2025A global research team has detailed how smart sensors, artificial intelligence (AI), machine learning, and Internet of Things (IoT) technologies are transforming the detection and management of environmental pollutants. Their comprehensive review highlights how spectroscopy and sensor networks are now key tools in real-time pollution tracking.